
WELCOME TO GMS ACCOUNTING ONLINE HELP
The help you need at your fingertips.
You are here: Tools > #416 Check Signatures
#416 Check Signatures
Function
This supplement allows an authorized user to include scanned images of signatures to be printed on accounts payable, payroll and manual checks.
This supplement is designed to only be used by agencies whose authorized users of scanned signatures have their own identifying user name and password. High security of scanned signatures must be in place in order to maintain a tight internal control.
GMS Recommendations
Things You Should Know
Creating a Signature Image File
To have GMS create signature files, #416 Check Signature Order form
You will need three things to create the jpg image file: signatures, a scanner of some type and photo editing software.
Almost all software that will allow you to edit a photo can be used to create a .jpg file for your check signatures.
The software must be able to set a page size of 2 inches by .5 inches or a size very close to that such as 2.1 inches by .490167. Pixel settings will determine how close you will be able to get to the required size. Any other size will result in the image becoming too distorted. Whatever image you designate will be stretched or compressed to fit the required 2 inch x .5 inch space provided in the Check Signature Supplement.
Create a document with 2 inch by one half inch boxes to be used to collect the check signatures.
Have the person authorized to sign checks sign their name in at least two boxes. This will allow you to select the best signature and give you a better chance of creating a clear image. When creating the signatures, use only black ink and be sure not to use a ballpoint pen. Ballpoints will create broken lines that do not transfer well to the image file. A new fine tip black marker works very well or an actual fountain pen with black ink. Advise the signers to stay within the box and do not write over any of the lines.
Open your editing software and set the page size to 2 inches by one half inch. Make a note of the Resolution number and save the file. Scan the signature image and cut the best signature. Cut as close to the lines as possible. Open the blank form and paste the signature onto the blank page, adjusting as necessary, until the image is centered and clear. Save the file in jpg format and name it in such a way that can be easily identified later.
Repeat with any other signatures you want to use.
When finished, the files should be moved to a secure location that will be available only to the staff members that will be authorized to use them.
This supplement allows an authorized user to include scanned images of signatures to be printed on accounts payable, payroll and manual checks.
This supplement is designed to only be used by agencies whose authorized users of scanned signatures have their own identifying user name and password. High security of scanned signatures must be in place in order to maintain a tight internal control.
GMS Recommendations
- Security should be the first priority for each client who installs this supplement.
- If you have never used any type of signatures, other than handwritten ones, for your checking account, you may want to check with your bank to see if they require any kind of written authorization.
- The Board documents in writing the names of the employees authorized to use the scanned images, rather than the positions. The employee name should tie to the authorized user name.
- Only one authorized user has access to the check signature setup file.
- Tight internal control be maintained on which users are given authorization to use the scanned images on checks. GMS recommends that only the employee(s) responsible for writing checks out of the specified account as designated by the Board be authorized users of those signatures. Since the authorized user goes by user name, it is necessary that the authorized users have their own user name and password.
- Scanned images should be saved in a folder that is not accessible to anyone other than the authorized users of those signatures.
Things You Should Know
- If you are unable to produce a scanned image of the signatures that you are satisfied with, GMS can create the files for you. Link to order form Each signature should be written within the space provided on the GMS Signature Form and Release, which allows for .5 inch x 2.0 inches.
- To get the best quality signature image, use a black ink pen, such as a roller ball or a fine line plastic tip. A new felt tip pen will also work, but it should be a fine line, or the image will be too bold. Do not use a ballpoint pen because it does not convert well.
- If the signature files cannot be found or read properly from the location specified in the setup, no signatures will be printed.
- For each bank account set up, you will specify if that bank account is for accounts payable only, payroll only or both.
- Each bank account can have up to two signatures files.
Creating a Signature Image File
To have GMS create signature files, #416 Check Signature Order form
You will need three things to create the jpg image file: signatures, a scanner of some type and photo editing software.
Almost all software that will allow you to edit a photo can be used to create a .jpg file for your check signatures.
The software must be able to set a page size of 2 inches by .5 inches or a size very close to that such as 2.1 inches by .490167. Pixel settings will determine how close you will be able to get to the required size. Any other size will result in the image becoming too distorted. Whatever image you designate will be stretched or compressed to fit the required 2 inch x .5 inch space provided in the Check Signature Supplement.
Create a document with 2 inch by one half inch boxes to be used to collect the check signatures.
Have the person authorized to sign checks sign their name in at least two boxes. This will allow you to select the best signature and give you a better chance of creating a clear image. When creating the signatures, use only black ink and be sure not to use a ballpoint pen. Ballpoints will create broken lines that do not transfer well to the image file. A new fine tip black marker works very well or an actual fountain pen with black ink. Advise the signers to stay within the box and do not write over any of the lines.
Open your editing software and set the page size to 2 inches by one half inch. Make a note of the Resolution number and save the file. Scan the signature image and cut the best signature. Cut as close to the lines as possible. Open the blank form and paste the signature onto the blank page, adjusting as necessary, until the image is centered and clear. Save the file in jpg format and name it in such a way that can be easily identified later.
Repeat with any other signatures you want to use.
When finished, the files should be moved to a secure location that will be available only to the staff members that will be authorized to use them.
Operating Instructions
Check Signature Setup Form
Check Signature Setup Form
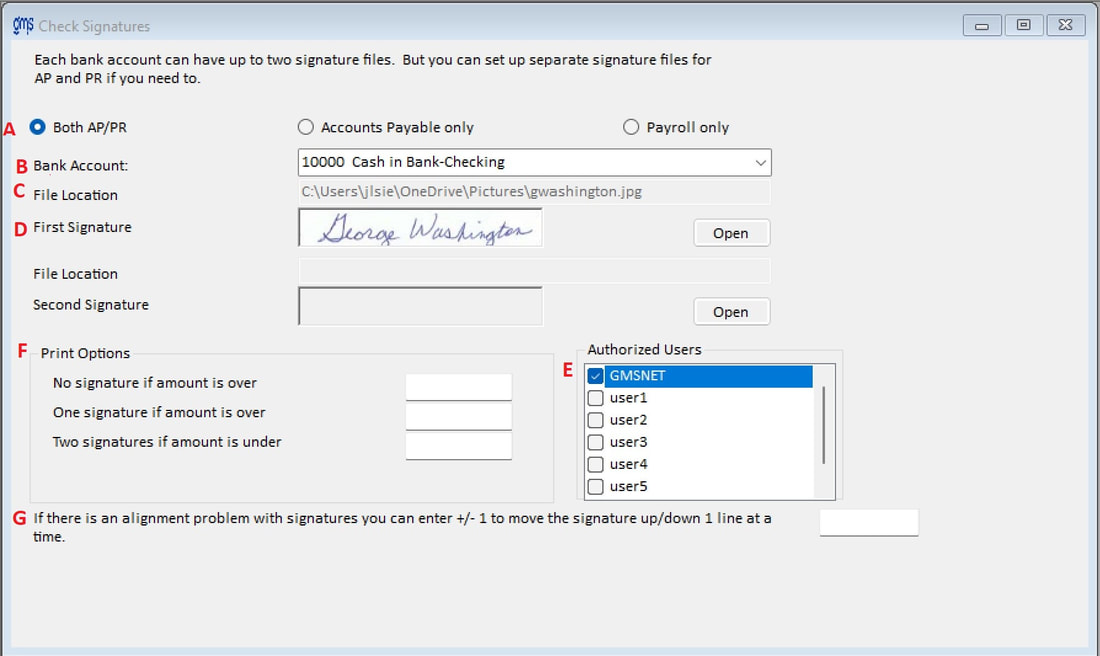
A Both AP/PR, Accounts Payable only, Payroll only: Check the appropriate function that will use the selected bank account.
B Bank Account: Select the GL cash account that you are going to assign scanned signature files to.
C File Location: Click on Open. Find the drive and path where the signature files are located. Double click on the file name to be used as the first signature.
D First Signature: If the specified signature file is located in the drive and path selected, it will display that signature in this field.
File Location: Click on Open. Find the drive and path where the signature files are located. Double click on the file name to be used as the second signature.
Second Signature: If the specified signature file is located in the drive and path selected, it will display that signature in this field.
F Print Options
If you want all the checks to include the signature files, you do not have to enter anything under Print Options.
No signature if amount is over: If all of the checks are to include the signature files, you should leave this box blank. If original signatures are required on checks over a certain dollar amount, enter that amount here.
One signature if amount is over: If one scanned signature is allowed on checks over a certain dollar amount, enter that amount here.
Two signatures if amount is under: If two scanned signatures are allowed on all checks under a certain dollar amount, enter that amount here.
E Authorized Users: Check those users who are authorized to use the scanned signatures for the bank account specified.
G Alignment Problem: If you need to move the signature up or down, you can put +1 to move the signature up one line or -1 to move the signature down one line. Fractions may also be used, i.e. +.5 to move the signature up ½ of a line or -1.5 to move the signature down 1 ½ lines.
Printing Checks: When printing checks, if the user logged in is an authorized user of scanned signatures for the bank account chosen, a message will be displayed. It states “This GL account has signature files. Do you wish to include signatures?” Answer Yes or No appropriately and the checks will be printed.
