
WELCOME TO GMS ACCOUNTING ONLINE HELP
The help you need at your fingertips.
You are here: Accounts Payable > AP Supplements > #330 Complete 1099's
#330 Complete 1099's
Function
Use the complete 1099 Supplement to issue Vendor 1099MISC and 1099NEC forms (non-employee compensation).
Use the complete 1099 Supplement to issue Vendor 1099MISC and 1099NEC forms (non-employee compensation).
1099 Processing Checklist
| 1099_check_list.docx |
Things You Should Know
- A 1099 will be generated for vendors that have the 1099 Eligibility box checked in the vendor file. B.

- The 1099 box designation will be read from the vendor file and included under Box # on the form. (A.)
- If 1099NEC is checked (C.) the number 1 will be auto entered into the 1099 box and eligible will also be checked. These vendors will receive Form 1099NEC rather than Form 1099MISC.
- On the bottom of the 1099 form there is a check box to Include 1099 refunds. By checking this box, the system will subtract any cash receipts entered that have been defined as a 1099 refund. (See the Help Section for Cash Receipts for more information).
- TIN numbers on all forms will need to be edited to include dashes in the appropriate locations after you have completed the Save/Prepare 1099 step. Be certain you have reviewed all forms for completeness plus to ensure all vendors are included before you begin the process of editing the TIN numbers. If you should find it necessary to Save/Prepare 1099 information again, you will lose all edits
Operating Instructions
NOTE: Make sure you have the December revisions installed before proceeding.
NOTE: Make sure you have the December revisions installed before proceeding.
Save/Prepare 1099
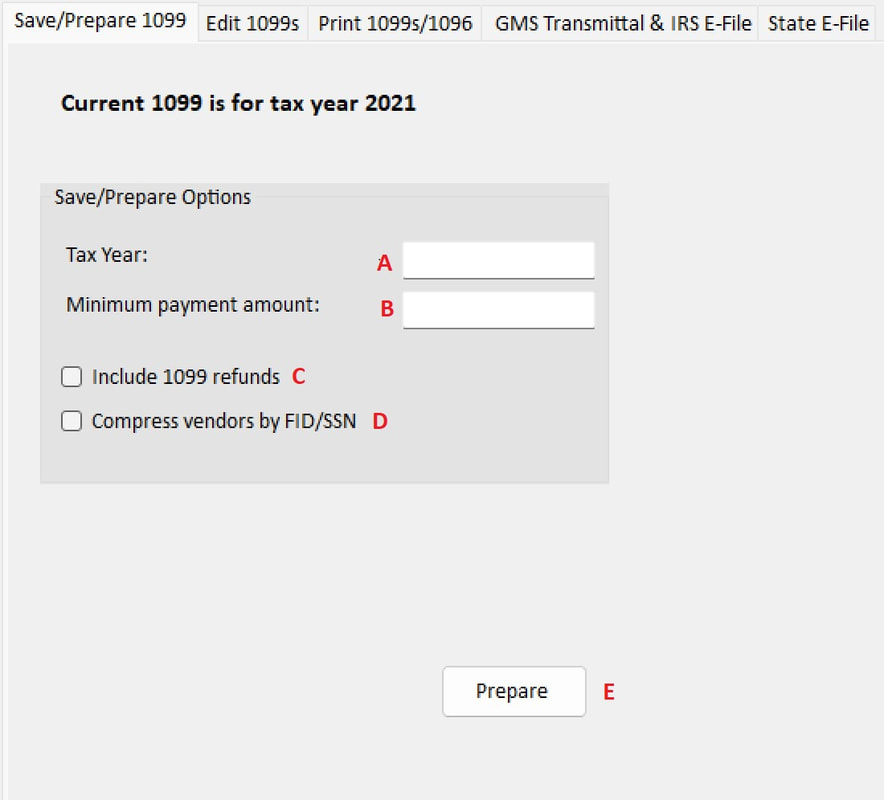
sub A. Tax Year: Enter the four-digit year for which 1099’s are being prepared.
B. Minimum payment amount: Enter the minimum dollar amount that you want 1099’s to be printed for. In most instances, $600 will be the minimum.
C. Include 1099 refunds: By checking this box the system will subtract any cash receipts entered that have been defined as a 1099 refund. If Supplement #336 Accounts Receivable is used, this function does not apply. (See the Help Section for Cash Receipts for more information).
D. Compress vendors by FID/SSN: For those agencies that have more than one vendor code set up for one vendor and want the 1099 amounts combined to produce one 1099, you should check this box. This step will check all vendors in the 1099 file for like Federal ID or Social Security numbers and combine amounts appropriately.
E. Prepare: Click this button when all the above information has been entered. The Prepare step can be run multiple times. For example, if you have processed this step and when reviewing the information, you omitted a vendor or have an incorrect box designation, you can make the correction in the vendor file and re-run the Prepare step. The system will re-create the 1099 file with the corrected information.
Edit 1099
Edit: This selection will allow you to edit all fields of a Vendor’s 1099 information except the Vendor number. As you click on the Edit button, it changes to Save. Please make sure that you save the record after making any changes. Also, use the Edit function to add new vendors to the 1099 grid.
Check Data: This option will prepare and display an error report. It will inform you of items such as missing FID numbers, or FID numbers of an incorrect length.
Proof: The proof provides all information to be printed on the 1099 for review. This gives you the opportunity for a final review before the forms are loaded into the printer. At the bottom of the report, the total number of forms required as well as the total dollar amount of all 1099s is listed including subtotals for 1099MISC and 1099NEC.
Print 1099s/1096
Include 4 digits SSN/FID: To only print the last 4 digits of the vendor’s Social Security number/Federal ID, check this box.
Print 1099 MISC: This will print the information on the 1099MISC forms. Initially, the data is displayed on the screen. At this point, please select the printer icon on the top left tool bar and follow the printer dialog boxes appropriately.
There are 4 copies of the laser 1099MISC form, each which contains information for two vendors. Copy A is for the IRS, Copy 1 is for the State, Copy C is for the payer and Copy B is for the recipient. Each copy is printed one time.
Print 1096 MISC This option will allow you to enter your contact information and print the 1096MISC form that gets submitted with your 1099MISC's to the IRS.
Print 1099 NEC: Putting a check in the “Copy A” box will combine both lines of the Address fields from the vendor file. Because of size limitations, the address will be cutoff if it doesn’t all fit. Leaving the “Copy A” box unchecked will print each address line on separate lines.
This will print the information on the 1099NEC forms.
There are 4 copies of the 1099NEC form, each contains information for two vendors. Copy A is for the IRS, Copy 1 is for the State, Copy C is for the payer and Copy B is for the recipient. Each copy is printed one time.
Print 1096 NEC: This option will allow you to enter your contact information and print the 1096NEC form that gets submitted with your 1099NEC’s to the IRS.
GMS Transmittal & E-File This takes you to the steps to prepare a file to electronically transmit the 1099 data to the IRS. Note: GMS does not submit any files to the SSA, IRS or State. It is the agency responsibility to submit their files.
Print: This allows you to print your electronic file setup information.
B. Minimum payment amount: Enter the minimum dollar amount that you want 1099’s to be printed for. In most instances, $600 will be the minimum.
C. Include 1099 refunds: By checking this box the system will subtract any cash receipts entered that have been defined as a 1099 refund. If Supplement #336 Accounts Receivable is used, this function does not apply. (See the Help Section for Cash Receipts for more information).
D. Compress vendors by FID/SSN: For those agencies that have more than one vendor code set up for one vendor and want the 1099 amounts combined to produce one 1099, you should check this box. This step will check all vendors in the 1099 file for like Federal ID or Social Security numbers and combine amounts appropriately.
E. Prepare: Click this button when all the above information has been entered. The Prepare step can be run multiple times. For example, if you have processed this step and when reviewing the information, you omitted a vendor or have an incorrect box designation, you can make the correction in the vendor file and re-run the Prepare step. The system will re-create the 1099 file with the corrected information.
Edit 1099
Edit: This selection will allow you to edit all fields of a Vendor’s 1099 information except the Vendor number. As you click on the Edit button, it changes to Save. Please make sure that you save the record after making any changes. Also, use the Edit function to add new vendors to the 1099 grid.
Check Data: This option will prepare and display an error report. It will inform you of items such as missing FID numbers, or FID numbers of an incorrect length.
Proof: The proof provides all information to be printed on the 1099 for review. This gives you the opportunity for a final review before the forms are loaded into the printer. At the bottom of the report, the total number of forms required as well as the total dollar amount of all 1099s is listed including subtotals for 1099MISC and 1099NEC.
Print 1099s/1096
Include 4 digits SSN/FID: To only print the last 4 digits of the vendor’s Social Security number/Federal ID, check this box.
Print 1099 MISC: This will print the information on the 1099MISC forms. Initially, the data is displayed on the screen. At this point, please select the printer icon on the top left tool bar and follow the printer dialog boxes appropriately.
There are 4 copies of the laser 1099MISC form, each which contains information for two vendors. Copy A is for the IRS, Copy 1 is for the State, Copy C is for the payer and Copy B is for the recipient. Each copy is printed one time.
Print 1096 MISC This option will allow you to enter your contact information and print the 1096MISC form that gets submitted with your 1099MISC's to the IRS.
Print 1099 NEC: Putting a check in the “Copy A” box will combine both lines of the Address fields from the vendor file. Because of size limitations, the address will be cutoff if it doesn’t all fit. Leaving the “Copy A” box unchecked will print each address line on separate lines.
This will print the information on the 1099NEC forms.
There are 4 copies of the 1099NEC form, each contains information for two vendors. Copy A is for the IRS, Copy 1 is for the State, Copy C is for the payer and Copy B is for the recipient. Each copy is printed one time.
Print 1096 NEC: This option will allow you to enter your contact information and print the 1096NEC form that gets submitted with your 1099NEC’s to the IRS.
GMS Transmittal & E-File This takes you to the steps to prepare a file to electronically transmit the 1099 data to the IRS. Note: GMS does not submit any files to the SSA, IRS or State. It is the agency responsibility to submit their files.
- Please check all fields in the top portion of the form for accuracy.
- You must also enter data in the Contact Information section. The file will not be created until all necessary fields are completed.
- When you are initially approved by the IRS for electronic filing you will be assigned a 5-character Transmitter Control Code (TCC). Make sure this code is correctly recorded in the TCC# field on this form.
Print: This allows you to print your electronic file setup information.
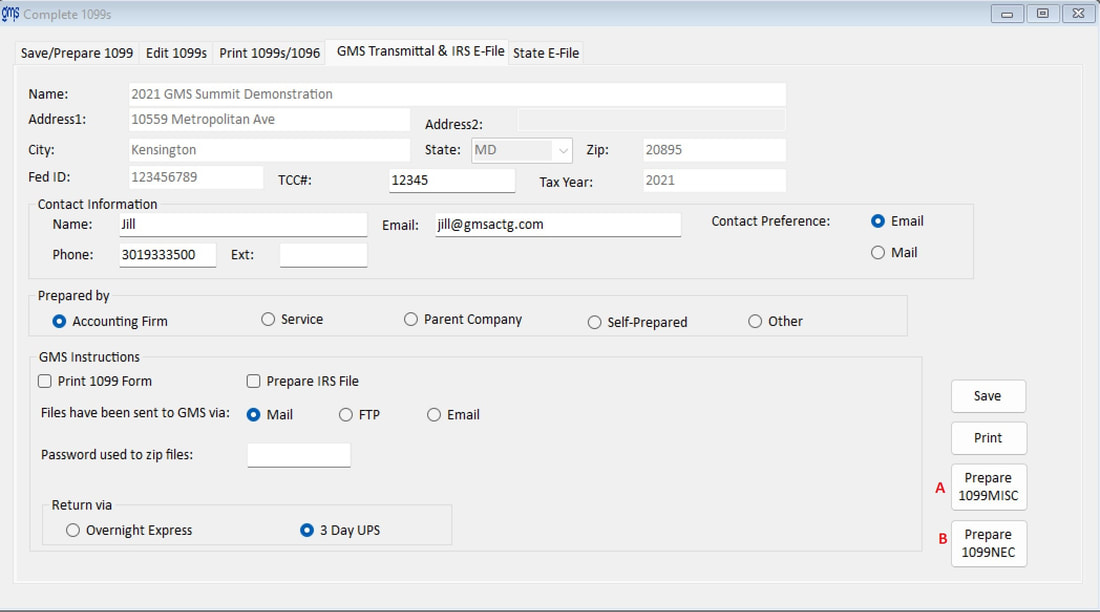
A. Prepare 1099 MISC This step will prepare the efile for 1099MISC as defined. GMS updates the software each year according to the IRS specifications.
B. Prepare 1099 NEC This step will prepare the efile for 1099NEC as defined. GMS updates the software each year according to the IRS specifications.
Note: If one or more 1099’s was omitted from the original electronic file submitted, Publication 1220 states: “Information returns omitted from the original file must not be coded as corrections. Submit these returns under a separate Payer “A” Record as original returns.” In the 1099 supplement, you can delete the vendors from the 1099 grid and just add in the ones omitted from the original file and prepare a new file to submit. Always make a backup before doing the above.
State E-File: Select this option if your state has an efile format that is different from the SSA.
State: Select the state from the drop-down box.
Note: Each state may have different criteria needed for the efile. The appropriate information needed will be displayed on the screen once the state is selected.
Save button: If you have made changes to any information appearing on this screen, be certain to Save.
Prepare button: Click here to prepare your file.
Correction:
To print and/or create a 1099 Misc/Nec and the appropriate e-file, the vendor’s needing the corrected form will need to be added to the grid.
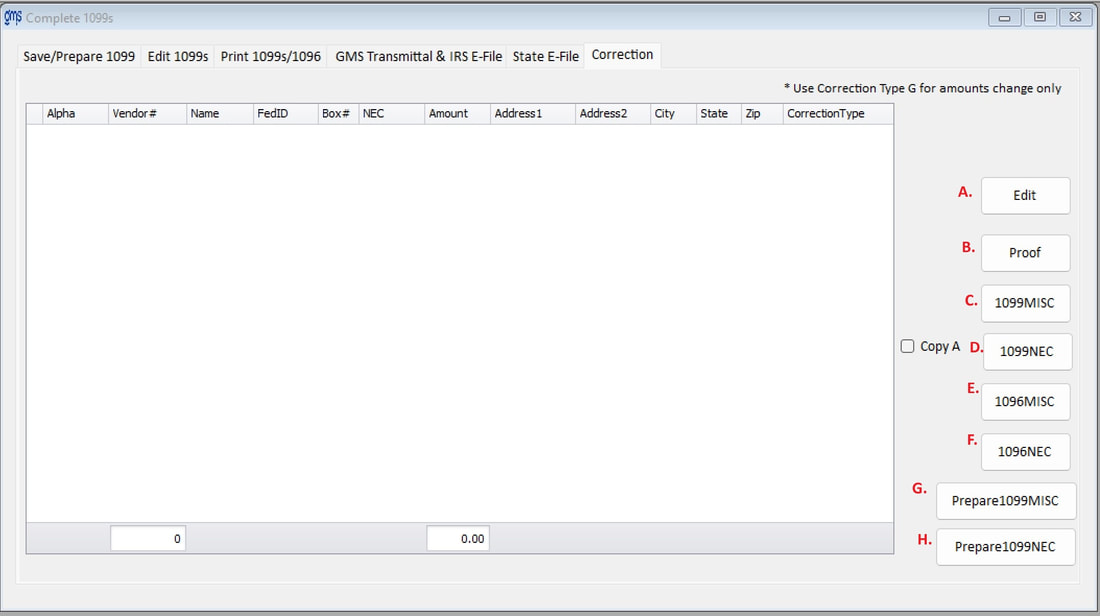
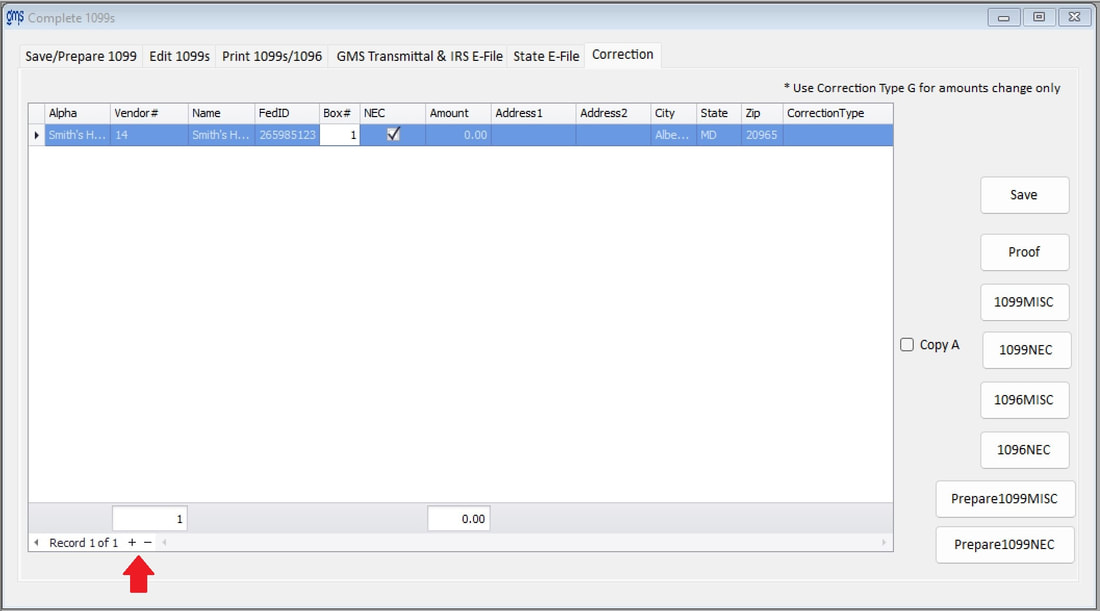
A. Select to add the vendor to the grid. Click on the + at the bottom of the grid and then select the vendor# or Name to add the vendor that needs a correction. Click on the – sign at the bottom to remove a vendor from this grid.
Any field can be changed. There must be a C or G in the Correction Type column. G should be used if the dollar amount has changed. C should be used if any other field has been changed. Click on Save when the corrections are complete.
B. After the vendor’s have been added, select to print the Proof listing.
C. Print the corrected 1099 Misc form for those vendors needing one.
D. Print the corrected 1099 NEC form for those vendors needing one.
E. Print the corrected 1096 Misc form.
F. Print the corrected 1096 NEC form.
G. Prepare the 1099 Misc corrected e-file.
H. Prepare the 1099 NEC corrected e-file.
For those clients choosing to have GMS print or prepare their 1099 forms and electronic files
Note: If you have requested that GMS print and/or prepare W2, 1099MISC and/or 1099NEC forms and electronic files, make sure that all types of forms are ready to be printed and/or prepared when you send an email telling us your file is ready to be uploaded.
NOTE: Please make sure you follow the instructions below for the type of database your organization uses (Microsoft Access or SQL Server)
For Microsoft Access Users
For SQL Server Users
B. After the vendor’s have been added, select to print the Proof listing.
C. Print the corrected 1099 Misc form for those vendors needing one.
D. Print the corrected 1099 NEC form for those vendors needing one.
E. Print the corrected 1096 Misc form.
F. Print the corrected 1096 NEC form.
G. Prepare the 1099 Misc corrected e-file.
H. Prepare the 1099 NEC corrected e-file.
For those clients choosing to have GMS print or prepare their 1099 forms and electronic files
Note: If you have requested that GMS print and/or prepare W2, 1099MISC and/or 1099NEC forms and electronic files, make sure that all types of forms are ready to be printed and/or prepared when you send an email telling us your file is ready to be uploaded.
- You must follow all steps completely through the Edit/Prepare 1099's, including printing the appropriate1099 Proof Listing(s) and checking for accuracy.
- Complete the GMS Instructions section on the bottom of this form.
- Once you are satisfied that all information is correct, do the following:
NOTE: Please make sure you follow the instructions below for the type of database your organization uses (Microsoft Access or SQL Server)
For Microsoft Access Users
- Click on Print 1099MISC (if submitting for the MISC type form or select Print 1099NEC if that is the appropriate form type) on the GMS Transmittal & E-file tab. Click on the Export icon. Choose the PDF format if that option is available to you. If not, choose Rich Text as the format. Under Destination, choose Disk file. Save the file in the GMSNet folder (or the folder that contains your organization’s database) titled “Cl #__ 1099xxxx (xxxx should be replaced with either MISC or NEC, depending upon which you are submitting) Transmittal Form (year)”. Fill in your client #. Repeat this process, selecting Print 1099NEC if also submitting for the NEC forms.
- On the Edit 1099 tab, click on Proof and click on the Export Icon. Choose the PDF format if that option is available to you. If not, choose Rich Text as the format. Under Destination, choose Disk file. Save the file in the GMSNet folder (or the folder that contains your organization’s database) titled “Cl # ___1099xxxx (xxxx should be replaced with either MISC or NEC, depending upon which you are submitting) Proof Listing (year)”. Fill in your client #.
- Go to the GMSNet folder. Use Ctrl Click to select the current conversionnet.mdb and 1099 Proof Listing(s) file (either PDF or RTF). Right click on the highlighted area and create the zip file. Save the zipped file as “Cl # ___1099(year).zip”. Fill in your client #.
- Notify [email protected] that the database (CL #___1099(year).zip) is available for upload. You will then be sent instructions for uploading your zipped database, 1099 transmittal form(s) and 1099 proof listing(s), along with secure sign in credentials. All files will be processed in the order received.
For SQL Server Users
- Click on Print 1099MISC (if submitting for the MISC type form or select Print 1099NEC if that is the appropriate form type) on the GMS Transmittal & E-file tab. Click on the Export icon. Choose the PDF format if that option is available to you. If not, choose Rich Text as the format. Under Destination, choose Disk file. Save the file in the GMSNet folder (or the folder that contains your organization’s database) titled “Cl #__ 1099xxxx (xxxx should be replaced with either MISC or NEC, depending upon which you are submitting) Transmittal Form (year)”. Fill in your client #. Repeat this process, selecting Print 1099NEC if also submitting for the NEC forms.
- On the Edit 1099 tab, click on Proof and click on the Export Icon. Choose the PDF format if that option is available to you. If not, choose Rich Text as the format. Under Destination, choose Disk file. Save the file in the GMSNet folder (or the folder that contains your organization’s database) titled “Cl # ___1099xxxx (xxxx should be replaced with either MISC or NEC, depending upon which you are submitting) Proof Listing (year)”. Fill in your client #
- Go to the GMSNet folder. Use Ctrl Click to select the current conversionnetSQL.bak and 1099 Proof Listing(s) file (either PDF or RTF). Right click on the highlighted area and create the zip file. Save the zipped file as “Cl # ___1099(year).zip”. Fill in your client #.
- Notify [email protected] that the database (CL #___1099(year).zip) is available for upload. You will then be sent instructions for uploading your zipped database, 1099 transmittal form and 1099 proof listing, along with secure sign in credentials. All files will be processed in the order received.
