
WELCOME TO GMS ACCOUNTING ONLINE HELP
The help you need at your fingertips.
W2 Processing
Function
Processes calendar year end W-2’s and clears the information from the YTD Earnings tab of the Employee File.
Things You Should Know
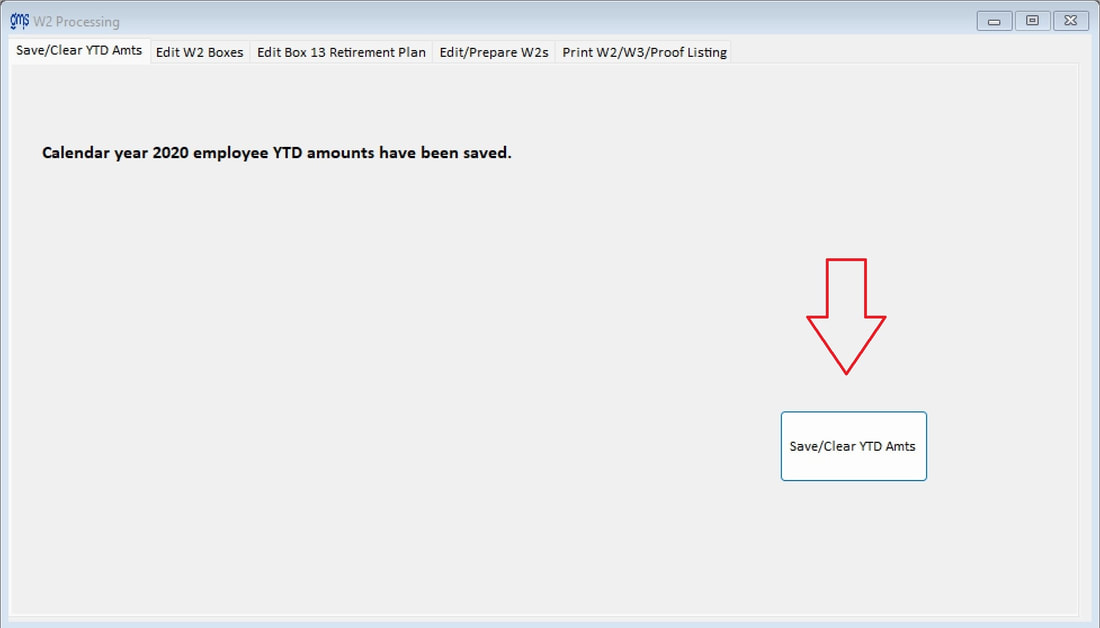
Save/Clear YTD Amts tab
Save/Clear YTD Amts button-
Processes calendar year end W-2’s and clears the information from the YTD Earnings tab of the Employee File.
Things You Should Know
- Confirm the December revision has been installed before editing or printing the W2s. The Save/Clear YTD Amts step can be done before this revision is installed.
- Timing of the Save/Clear YTD Amts step is critical. This step needs to be done after the final paychecks dated in December are processed, quarterly payroll processing has been completed, and before the first paychecks dated in January are processed. Once this step is complete, you can begin the payroll processing in the new calendar year. Since the W2 information is saved during this step, you may come back later to actually prepare the W2 forms.
- Should you try to do the prepare payroll or prepare direct deposit step(s) in a new calendar year without first doing the Save/Prepare step, you will be prompted that you cannot continue until Save/Prepare is done.
Save/Clear YTD Amts tab
Save/Clear YTD Amts button-
When this option is selected, the following will take place:
Note: Make sure all other staff are out of GMS before doing this step.
When you select this option, the following message will be displayed:
“Last payroll check date is ______. Are you sure you want to prepare system for the new year?”
If the last paychecks for the calendar year have been run, proofed and YTD amounts have been verified, select Yes.
When you click on OK, a message will appear notifying you that the database has been backed up and all employee YTD data has been zeroed out.
Note: Once this step has been completed for a year the system will not allow this process a second time.
Edit W2 Boxes tab
NOTE: The December revisions need to be installed before doing this step. If they haven’t been, this step will need to be redone after the revision is installed.
In order to properly prepare your W2 forms, you need to identify the appropriate box number(s) and code(s) on the W2 to record the Year To Date amounts for certain deductions. Deductions for qualified pension plans, deferred compensation, and qualified Cafeteria Health plans are only a few examples of these types of deductions. Please refer to the W2 instructions located on the IRS.gov website for a listing of the box numbers and codes that are required.
This tab displays the organization’s deduction information that has been used for payroll processing. Only the W2 Box and Retirement(Y/N) columns can be edited. Click on Edit before changing the grid.
Note: Make sure all other staff are out of GMS before doing this step.
- A copy is made of your organization’s database with a file name that includes the calendar year date for future retrieval, if necessary. An example of the file name is conversionnetW212-31-22.mdb (Access databases). This backup will be in the same folder as the current database, typically GMSNET. If you are using a SQL database, you must manually make a backup of the database.
- Year to Date payroll information is copied into special tables to be used for the W2 preparation steps.
- Year to Date information from the Employee File is cleared.
- YTD maximum deductions fields in Employee Files will be lowered by the amount of YTD withheld during the calendar year.
- The current year’s maximum Social Security amounts are saved in tblFICAW2.
- YTD payroll detail for the year you are preparing W2’s for is saved in a prior year table.
When you select this option, the following message will be displayed:
“Last payroll check date is ______. Are you sure you want to prepare system for the new year?”
If the last paychecks for the calendar year have been run, proofed and YTD amounts have been verified, select Yes.
When you click on OK, a message will appear notifying you that the database has been backed up and all employee YTD data has been zeroed out.
Note: Once this step has been completed for a year the system will not allow this process a second time.
Edit W2 Boxes tab
NOTE: The December revisions need to be installed before doing this step. If they haven’t been, this step will need to be redone after the revision is installed.
In order to properly prepare your W2 forms, you need to identify the appropriate box number(s) and code(s) on the W2 to record the Year To Date amounts for certain deductions. Deductions for qualified pension plans, deferred compensation, and qualified Cafeteria Health plans are only a few examples of these types of deductions. Please refer to the W2 instructions located on the IRS.gov website for a listing of the box numbers and codes that are required.
This tab displays the organization’s deduction information that has been used for payroll processing. Only the W2 Box and Retirement(Y/N) columns can be edited. Click on Edit before changing the grid.
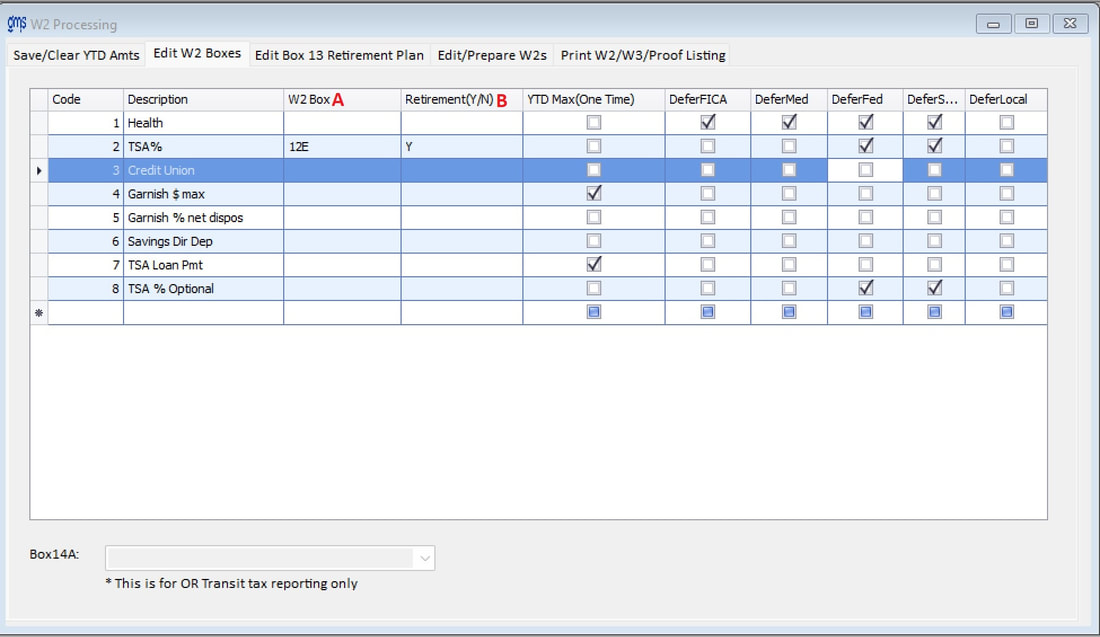
A. W2 Box – for applicable deductions, please enter the appropriate W2 form box number, i.e. Box12D. Do NOT put a space between the 12 and D.
B. Retirement (Y/N) – this box is to be marked appropriately (Y/N) as to whether the deduction is for a qualified pension plan. If the box is marked “Y” and there is an amount on the YTD Earning tab of the Employee File for this deduction, an “X” will be printed in box 13 of the W2, and the total YTD amount of all qualifying deductions will appear in the box. If this is the case, you need to designate the W2 box column for that deduction as 12AA, 12BB, 12D through 12H or 12S. If an employee needs to have an “X” in box 13, however, there is no YTD amount for the deduction(s), the “X” will have to be placed on the W2 through the Edit/Prepare W2s tab OR see section below titled “Edit Box 13 Retirement Plan tab” if employees have a retirement plan paid entirely by the employer and therefore have no deduction.
For clients in the state of Oregon:
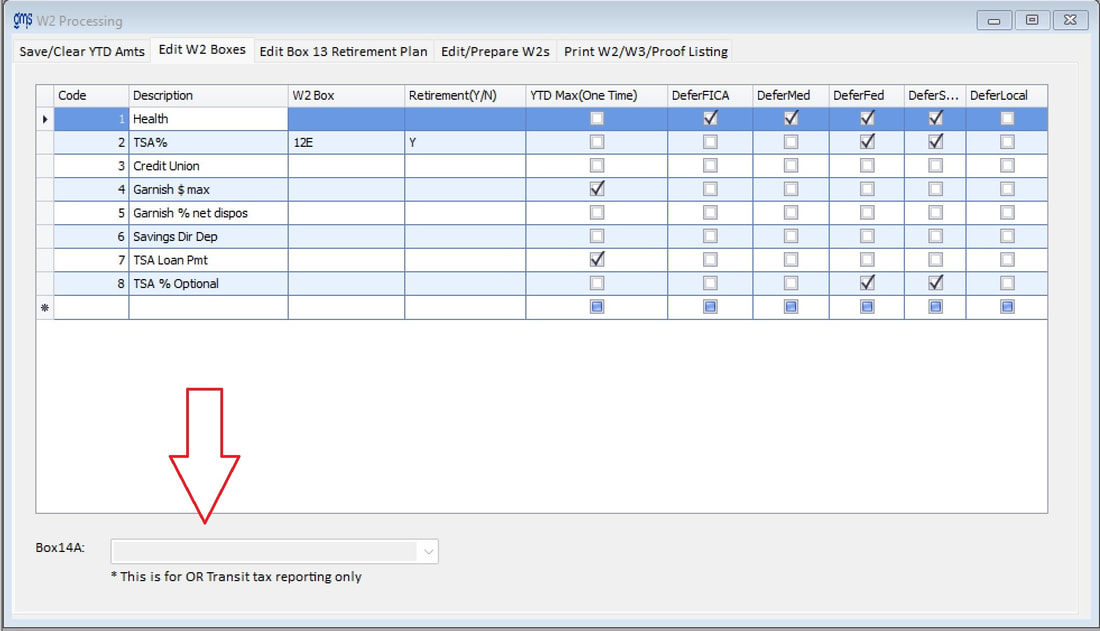
To have the YTD amount of the Statewide Transit tax automatically appear on the W2 in box 14, select the local tax from the drop down box.
Edit Box 13 Retirement Plan tab
If your organization does not have a retirement deduction, this tab is to be used to put an “X” in box 13 on the W2.
By Classes – If class is selected, identify the appropriate class(es) of employees participating in the retirement plan.
Include all Classes – The default is to include all classes. If the checkmark is removed, a form will appear allowing showing all classes. Place a check mark in the class(es) that will need an “X” in box 13 on the W2.
By Optional Question – If an optional question is the trigger for the retirement participation, identify the appropriate optional question. The response to the optional question can be anything other than No to identify them as participating in the retirement plan.
Edit/Prepare W2’s Tab
The Prepare W2 step takes all the calendar year payroll information and prepares the W2 tables according to the instructions given on the Edit W2 Boxes tab. If the W2 Box instructions are edited, the Edit/Prepare W2s step must be done again.
It will prompt the question “W2 has been prepared for the tax year XXXX. Do you want to override?”. If the W2 Box instructions have changed, answer Yes. Any editing that has been done will be gone when answering Yes.
When preparing W2’s, Box 14 amounts and descriptions are in two separate fields with 9 digits of the description printed.
Any classes that are set up in the Class Setup with an N under State will not have wages printed in the State Wage box on the W2’s.
Include all classes – If W2’s are to be printed for all classes of employees, leave this box checked. If W2s are prepared for only certain classes of employees, uncheck the box and then check the individual classes that are to receive W2’s.
Sort by - This option allows the user to sort the order in which the W2’s will be printed. Available options are Alpha (alphabetically by last name), Code (numerically by employee code), or Site (grouped by site, and sorted alphabetically within each site). For those agencies with large staff and the W2’s are not mailed, the sort by site option will aid you in organizing your W2’s for distribution.
Edit W2 tab
Use the Edit W2 tab to make any changes to the W2’s on an individual employee basis. An example of the need for this type of edit is to change an address or record third party sick pay received by an employee during the course of the year, assuming that it has not been added to the employee file previously through the payroll function.
Also use the Edit W2 tab if you need to add an employee that doesn’t exist in the employee master file because you need to send them a W2 form. To do so, click the New button and enter a new employee code in the Employee# field and tap enter or use your tab key.
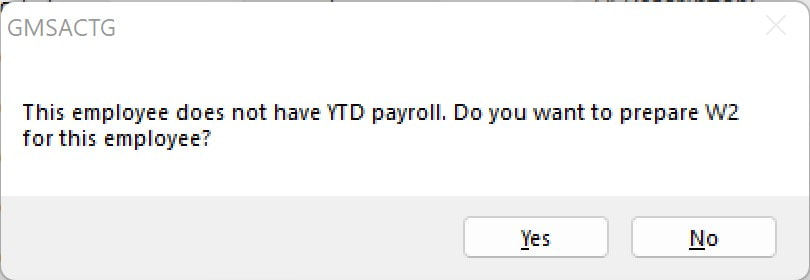
Click on Yes and fill in all of the fields that are applicable. Then click Save. This does not add this employee to the employee master file table.
Definitions of each box and the code(s) associated can be found in the W2 instructions on the IRS.gov website
Box 14 – Other. If you are using W2 box 14 to designate amounts, you may include up to 3 different amounts to appear. Enter the description and the amount
Print W2/W3/Proof Listing tab
On this tab, you may print your W2 Proof Listing, W2 Forms, W3 form, and create your W2 Transmittal.
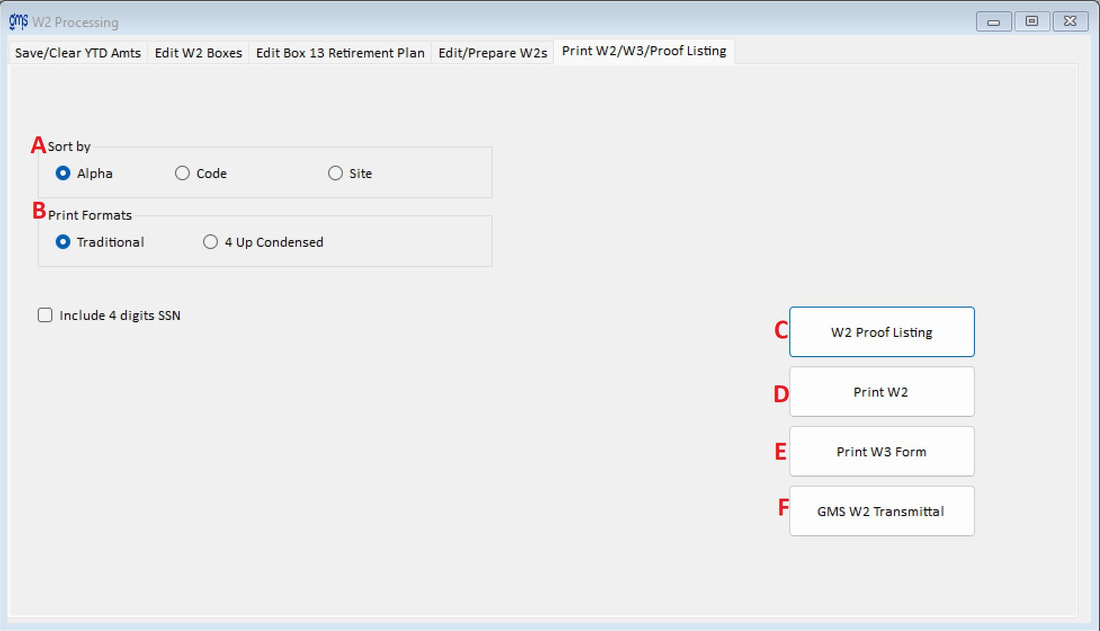
A. Sort by - This option allows the user to sort the order in which the W2s will be printed. Available options are Alpha (alphabetically by last name), Code (numerically by employee code), or Site (grouped by site, and sorted alphabetically within each site). For those agencies with large staff and the W2s are not mailed, the sort by site option will aid you in organizing your W2s for distribution.
B. Print Formats - There are two different types of forms available for printing W2s. The appropriate form can be selected based on the individual client’s needs/preferences.
Include 4 digits SSN: To only print the last 4 digits of the employee’s Social Security number, check this box.
Traditional - These are 2-Up Forms for organizations that have less than 10 employees and wish to submit Copy A to the Social Security Administration on paper rather than electronically. Each copy has information for two employees. Copy A is printed and submitted to the SSA. There are four more copies, one of which is printed twice. This will yield one copy for the employer, one copy for the employee’s records and three for the employee to use for their personal tax filing.
4-Up Condensed - These forms are for employers who are filing electronically with the Social Security Administration. There are two copies, an employer copy, and an employee copy each of which contains four forms with information for one employee. Each copy is printed one time.
C. W2 Proof Listing – This prints a W2 Proof Listing of all Employee W2 information to be reviewed for accuracy and proper format before the actual W2 forms are printed.
D. Print W2 - This step prints the W2 forms. As this option is exited, the system will display the summary report information to be used for the preparation of the W3 transmittal form. This information may be printed.
Note: a message will appear giving you the option to adjust the position of the printed information on the form should it be necessary.
E. Print W3 Form - Select this button to print the W2 information on the W3 form.
A form to fill in the contact information will be displayed. Enter the contact’s name, email, phone, and fax number. Also, put a checkmark next to Third Party Sick Pay if any of the W2’s contain third party sick pay and Box 13 has been checked. Also enter the amount of federal income tax withheld by the 3rd party.
Select from the drop-down box the Kind of employer the agency is.
Note: If no amount is entered in the field for "Amount of federal income tax withheld by third party" we will print 0.00 on the W3 form.
F. GMS W2 Transmittal - For those clients choosing to have GMS print their W2’s or prepare the electronic file(s), select the Prepare GMS W2 Transmittal, and fill in all the fields. If the W2 SSA electronic file will be prepared, the SSA User ID (aka TCC #) must be filled in. This field is not required when GMS is ONLY printing the forms. The W2’s will be shipped to the address that is entered in the transmittal form. See instructions below on sending this transmittal to GMS. The form can be found here Instructions if GMS is printing W2's or preparing e-files
Note: When this option is selected, your organizational information will appear on the top portion of the form. Should you see any incorrect information you must exit this form and make the appropriate changes through Tools\Organization\Organization Info.
Should you require GMS to prepare a state file, make sure you designate a state code and deadline.
Should you require GMS to prepare a local file, make sure the Prepare Local File box is checked.
Electronic File Creation: Payroll Supplement #400 W2 Electronic File Reporting is available to prepare the electronic file for SSA, State and Local submission. For more information, please look for this option in your Help Manual under PR Supplements. Note: GMS does not submit the electronic file to either the SSA or IRS.
