
WELCOME TO GMS ACCOUNTING ONLINE HELP
The help you need at your fingertips.
You are here: General Ledger > G/L Master Files > G/L Code
G/L Code
Function
Enter, change, find, print, or delete general ledger transaction codes and descriptions.
Things You Should Know
A new project number (30000-39699) should be set up for every new grant period. New program element codes would also be set up for every new grant year. When establishing new GL codes for projects that renew every year, GMS recommends that you add the 2-digit FY as the last 2 digits of the Project Code. For example, if the Project number in FY24 is 33024, use 33025 as the project number for that program in FY25.
When a general ledger transaction code is used (budget input, coding on vouchers, journal entries, etc.) this file will be checked to verify the existence of the code. If it does not exist, the code cannot be used.
If any transactions have been coded to a general ledger transaction code, the code is prohibited from being deleted.
Should you wish to delete a Project that has Elements assigned to it you must first delete all of that project's elements.
Note: To have only active codes appear in list boxes throughout the system, go to Tools\Organization and check the box that says "Include active codes only in list boxes."
Operating Instructions
GL Code Document Attachment
Enter, change, find, print, or delete general ledger transaction codes and descriptions.
Things You Should Know
- General ledger transaction codes are an important part of the design of the GMS system. These 5-digit codes establish the account structure for the general ledger and also define line-item descriptions for revenues and expenditures. Codes are to be assigned as follows:
- 10000-19999 Asset Accounts
- 20000-29999 Liability Accounts
- 30000-39999 Project Equity Accounts, Fund Balances and Net Assets
- 40000-49999 Revenue Accounts
- 50000-99999 Expenditure Accounts
- Certain codes are reserved and predefined for restricted purposes:
- 50000 Salaries
- 50500 Fringe Benefits
- 59700 Indirect Costs
- 59900 Common Costs
- 39700 General Ledger
- 39800 Fringe Benefit Pool
- 39900 Indirect Cost Pool
A new project number (30000-39699) should be set up for every new grant period. New program element codes would also be set up for every new grant year. When establishing new GL codes for projects that renew every year, GMS recommends that you add the 2-digit FY as the last 2 digits of the Project Code. For example, if the Project number in FY24 is 33024, use 33025 as the project number for that program in FY25.
When a general ledger transaction code is used (budget input, coding on vouchers, journal entries, etc.) this file will be checked to verify the existence of the code. If it does not exist, the code cannot be used.
If any transactions have been coded to a general ledger transaction code, the code is prohibited from being deleted.
Should you wish to delete a Project that has Elements assigned to it you must first delete all of that project's elements.
Note: To have only active codes appear in list boxes throughout the system, go to Tools\Organization and check the box that says "Include active codes only in list boxes."
Operating Instructions
GL Code Document Attachment
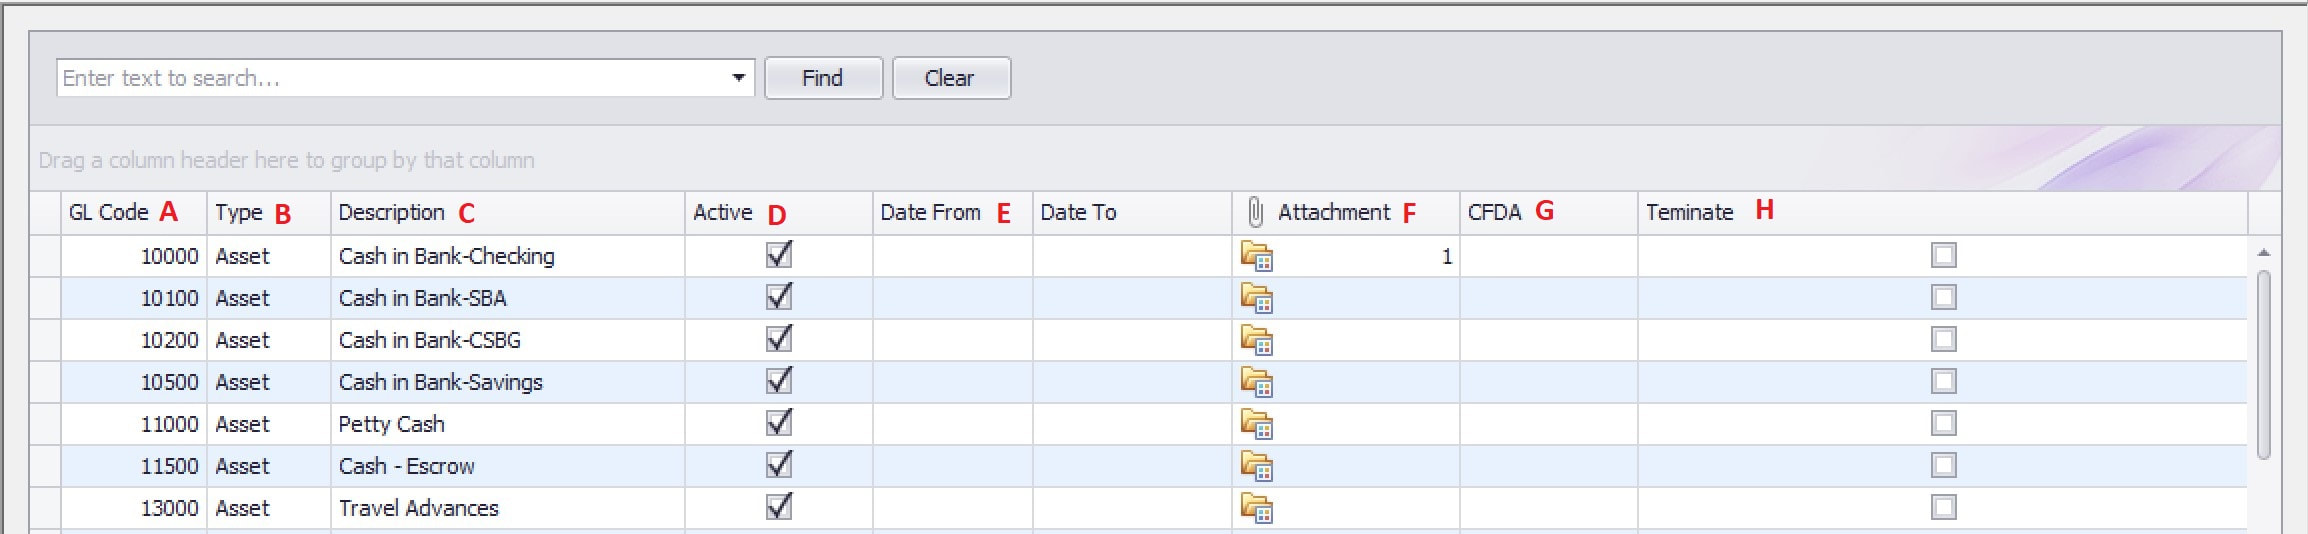
A. Code: Enter a 5-digit code (10000-99999).
B. Type: This column will be automatically populated when a code is saved.
C. Description: Enter a description for the code. Descriptions may be up to 70 characters in length and will print 50 characters when space is allowed.
D. Active: To change the code status from Active to Inactive, uncheck the check mark in the Active box. General Ledger codes marked inactive cannot be used in data entry.
If you uncheck the active box on a GL code it will not appear in any combo boxes during data entry and is not available for use during coding in any book of entry. Also, if the GL code marked as inactive is a Project code and it does not fall within the current fiscal year, it will not be included in list boxes such as the Revenue & Expenditure Report by Project list box. Additionally, if a project is inactive and the project period does not fall within the current fiscal year, it will not be included in list boxes such as Revenue & Expenditure by Project list box. Any GL code that is marked as inactive will be rolled forward to the new fiscal year. This is to enable you to retrieve prior year reports.
Codes in the Inactive status can be removed during the Archive Process.
E. Dates From/To: For the Project codes (3000-39699), enter the beginning and ending dates of the grant/contract. The dates entered will appear on the financial reports.
F. Attachment: GMS gives the ability to attach an external document. An example of an attached document is a pdf image or Word doc of a grant/contract to a specific project code. To accomplish this, click on the folder in the Attachment column. A New Document form will appear with the Source combo box defaulted to General Ledger. The Doc# fields will also automatically be populated with the GL code. Browse to find the document to be attached. Once the document name is selected, click on Save.
Multiple documents can be attached to a General Ledger Code. The number to the right of the folder represents the number of documents attached.
To “un-attach” a document, highlight the existing file name and click on the Delete button on the bottom. Note: this step does not delete the document, it merely “un-attaches” it from the GL code.
G. CFDA: Enter the CFDA number for the Project
H. Terminated: Terminated will be an option if Supplement #521 Terminate Elements is installed. During data entry, a message will appear stating the element has been terminated and should no longer be used and gives the ability to change to a different code or continue to use it. This is most useful when contracts end, and new ones begin to alert an item is being miscoded. Put a checkmark in this box if the code is terminated and should no longer be used.
Print Options: Options to print Active/Inactive/Terminated or All. Active/Inactive/Terminated will print all the Active codes first, followed by Inactive codes, ending with Terminated codes. (Terminated will be an option if you have purchased Supplement #521 Terminate Elements.) You may then select which pages you wish to print. All will print all codes without regard to their status.
