
WELCOME TO GMS ACCOUNTING ONLINE HELP
The help you need at your fingertips.
You are here: General Ledger > Budgets and P/Y R&E
Budgets and P/Y R&E
Budget Data Entry Procedures
Function
Enter, change, print, display and export budgets.
Things You Should Know
Project Budgets
These budgets appear on the element and project revenue and expenditure reports. They are to be entered for the entire grant or contract period and will be compared with project to date amounts.
Indirect Cost Budget
Entered for each indirect cost pool (elements 999000-999900). Indirect cost budgets are compared to fiscal year-to-date amounts charges in the indirect cost pools.
Fringe Benefit Budget
Used to monitor charges to the Fringe Benefit Pool. Compared to fiscal year-to-date charges in the Fringe Benefit Pool (Element 998000).
YTD Timesheet Budgets
Time sheet budgets are expressed in hours and appear on Year-to-date Timesheet Charges by Employee and by Activity reports where they are compared to fiscal year-to- date hours charged on timesheets.
Agencywide Budgets
Appear on Agencywide Line Item Revenue and Expenditure report. Enter for the agency's budget for the fiscal year. On financial reports they are compared to fiscal year-to-date revenues and expenses.
Document Attachments
The system gives you the ability to attach an external document to an existing budget. An example of an attached document is the Excel spreadsheet on which the budget was created. To accomplish this, once an existing budget is on the form, click on the Documents button on the tool bar across the top of your screen. A New Document form will appear with the Source combo box defaulted to Budget. The Doc# fields will also automatically be populated. At this point you can open Windows Explorer or My Computer and locate the document you wish to attach. Then simply drag and drop the document by placing the cursor over the document name, left click and drag it to the New Document form in GMS. Once the cursor is anywhere on the New Document form simply let go of the cursor button and the complete file name and path will appear in the File Name field. Then save the document attachment. Another option is to click on the >> symbol to the right of the File Name field and locate the document to be attached. Once the document is selected, click on open then save the document attachment.
Once a document is attached a paperclip image will appear on the bottom of the form. Should you wish to view a document already attached, click on the paper clip. If there is only one document attached, when you click on the paper clip the document will open. If there are multiple documents attached the view document form will appear and you may choose which document you wish to view.
Should you wish to add additional documents to the budget, once the grid appears with the currently attached document(s) click on the New button on the bottom of the form and repeat the attachment process.
Should you wish to “un-attach” a document, highlight the existing file name and click on the Delete button on the bottom. Note: this step does not delete the document, it merely “un-attaches” it from the existing budget.
Project/Program Budgets
Function
Enter, change, print, display, or export Program Element and Project budgets.
Things You Should Know
Operating Instructions
Follow these data entry procedures to maintain Program and Project budgets.
To enter budget data:
Click on General Ledger, select Budget and PY R&E.
Click on New.
Select a Budget Type, whether the budget to be entered is a Project or an Agencywide budget.
Budget Name: If Agencywide is selected, choose the appropriate agencywide budget type: Agencywide Budget, Fringe Benefit Budget, Indirect Budget or Timesheet Budget.
If Project is selected, enter the name of the Program or Project Budget you wish to enter. We recommend that the name of the budget begins with the project or element code.
Project: Select the Project that you wish to enter the budget for.
Program Element: If the budget is for the entire project, do not enter an element code. If there are separate budgets for each element within the project, then select the applicable element code for each budget name.
Note: If you enter several project’s budgets under one budget name, when and if these projects get rolled forward to the new fiscal year, it will assign new budget names for those projects that were not assigned to a budget name.
Add new line item: Click on the plus (+) sign below the grid and to the right of the Record number.
GL Code: Enter the appropriate revenue or expenditure code, or click on the combo box to choose a code from the list.
Description: This will automatically populate based upon the GL Code entered.
Project: This will automatically populate based upon the Project entered above.
Elem: Enter the desired element number or click on the combo box to choose a program element from the list. If you entered an element number above, this will be automatically populated with that number.
Amount: Specify the dollar amount of the budget for revenue or expense for that particular program element or project.
Prior Year: This will be automatically populated if you have rolled forward the element selected.
Distribution Grid: The grid shows the following information: GL Code and Description, Project, Program Element, Amount and Prior Year, if applicable. If an error is discovered within the grid area information, to edit, click on the field in the distribution grid area you wish to change, use your backspace key to clear previously entered information, then re-key the correct data. If you choose to delete an entire budget line item amount, simply click on the line item you wish to remove and then click on the minus (-) sign next to Record below the grid.
Revenues: Is the total amount of all project and program element revenue line item budget amounts. This field cannot be edited.
Expenses: Is the total amount of all project and program elements expenditure line item budget amounts. This field cannot be edited.
Balance: Is the total revenues over expenditures.
If you wish to Edit an existing budget:
Click on the budget name in the listing of your budgets.
Edit: Click this button to edit any information in the grid.
Save: Click this button to save a new revenue or expense line item budget just added or after changing an existing revenue or expense line item budget amount.
Delete: Click this button to delete a newly added or an existing Program or Project budget.
Print: Click this button to display the Print options.
Element”.
Exit: Click the red X to exit the Budget and PY R&E.
Indirect Budget
Function
Enter, change, print, display or export the Indirect Cost Budget.
Things You Should Know
Operating Instructions
Follow these data entry procedures to maintain the Indirect Cost Pool budget.
To enter or change budget data, Click on General Ledger, then select Budget and PY R&E.
Select New if you are entering a new budget. Select Type of Agencywide. Next select Indirect Budget as the Budget Name.
If making changes to an existing budget, select Indirect Budget from the listing of your budgets. Click on Edit.
Add new line item: Click on the plus (+) sign below the grid and to the right of the Record number.
GL Code: Enter the appropriate revenue or expenditure code, or click on the combo box to choose a code from the list.
Description: This will automatically populate based upon the GL Code entered.
Project: This will automatically populate based upon the Budget name selected above.
Program Element: Enter the desired element number or click on the combo box to choose a program element from the list. You may use 999000-999900.
Amount: Specify the dollar amount of the budget for revenue or expense for that particular program element.
Tap enter or click on the next row to record entered budget information.
Distribution Grid: The grid shows the following information: GL code and description, project code, program element code, and amount. If an error is discovered within the grid area information, to edit click on the field in the distribution grid you wish to change, use your backspace key to clear previously entered information, then re-key the correct data. If you choose to delete an entire budget line-item amount, simply click on the line item you wish to remove and then click on the minus (-) sign next to Record below the grid.
Revenues: Is the total amount of the Indirect Cost Pool revenue line item budget amounts. This field cannot be edited.
Expenses: Is the total amount of the Indirect Cost Pool expenditure line item budget amounts. This field cannot be edited.
Balance: Is the total Revenues over Expenditures.
Save: Click this button to save a new revenue or expense line item budget amount just added or after changing an existing revenue or expense line item budget amount.
Delete: Click this button to delete the Indirect Budget.
Print by Element: Click this to print or display a list of all existing Indirect Cost Pool Element Budgets.
Print by Project/Employee: Click this button to print or display a list of all existing Indirect Cost Pool Project Budgets.
Exit: Click the red X to exit the Budget and PY R&E.
Fringe Benefit Budget
Function
Enter, change, print, display, or export the Fringe Benefit Pool Budget.
Things You Should Know
Operating Instructions
To enter or change budget data, Click on General Ledger, then select Budgets and PY R&E.
Select New if you are entering a new budget. Select Type of Agencywide. Next select Fringe Benefit Budget as the Budget Name.
If making changes to an existing budget, select Fringe Benefit Budget from the listing of your budgets. Click on Edit.
Add new line item: Click on the plus (+) sign below the grid and to the right of the Record number.
GL Code: Enter the appropriate expenditure code, or click on the combo box to choose a code from the list.
Description: This will automatically populate based upon the GL Code entered.
Project: This will automatically populate based upon the Budget name selected above.
Program Element: Enter the element number 998000 or click on the combo box to choose the program element number 998000.
Amount: Specify the dollar amount of the budget line item expenditure for the Fringe Benefit Cost Pool Budget.
Tap enter or click on the next row to record entered budget information.
Distribution Grid: The grid shows the following information: GL code and description, project, element, project, and amount. If an error is discovered within the grid area information, to edit, click on the field in the distribution grid you wish to change, use your backspace key to clear previously entered information, then re-key the correct data. If you choose to delete an entire budget line-item amount, simply click on the line item you wish to remove and then click on the minus (-) sign next to Record below the grid.
Revenues: This amount would be zero at all times since no revenue line item budget amounts are to be entered for the Fringe Benefit Cost Pool. This field cannot be edited.
Expenses: Is the total amount of the Fringe Benefit Cost Pool expenditure line item budget amounts. This field cannot be edited.
Save: Click this button to save a new expense line item budget amount just added or after changing an existing expense line item budget amount.
Delete: Click this button to delete the Fringe Benefit Budget.
Print by Element: Click this button to print or display the Fringe Benefit Element Budget.
Print by Project/Employee: Click this button to print or display the Fringe Benefit Project Budget.
Exit: Click the red X to exit.
Time Sheet Budgets
Function
Enter, change, edit, display, print or export the employee timesheet budgets.
Things You Should Know
Operating Instructions
To enter or change budget data, Click on General Ledger, then select Budgets and PY R&E.
Select New if you are entering a new budget. Select Type of Agencywide. Next select Timesheet Budget as the Budget Name.
If making changes to an existing budget, select Timesheet Budget from the listing of your budgets. Click on Edit.
Add new line item: Click on the plus (+) sign below the grid and to the right of the Record number.
Employee Num: Enter the employee’s code number, or click on the combo box to choose a code from the list.
Name: This will automatically populate based upon the Employee Code entered.
Project: This will automatically populate based upon the element number entered.
Program Element: Enter the program element number from which the employee’s working hours or leave time will be paid.
Hours: Enter the hours budgeted for the selected element.
Emp Class: This will automatically populate based upon the class assigned to the employee in the Employee Master File.
Tap enter or click on the next row to record entered budget information.
Distribution Grid: The grid shows the following information: Employee number and name, project, program element, hours, and employee’s class code. If an error is discovered within the grid area information, to edit, click on the field in the distribution grid you wish to change, use your backspace key to clear previously entered information, then re-key the correct data. If you choose to delete an entire budget line-item amount, simply click on the line item you wish to remove and then click on the minus (-) sign next to Record below the grid.
Hours: This will be the sum total of the hours entered. This field cannot be edited.
Save: Click this button to save a new budget just added or after changing an existing line item budget amount.
Delete: Click this button to delete the Timesheet Budget.
Print by Element: Click this button to print or display the Timesheet Budget by Element code.
Print by Project/Employee: Click this button to print or display the Timesheet Budget by Employee.
Exit: Click the red X to exit.
Agencywide Budgets
Function
Enter, change, print, or display agency wide budgets.
Things You Should Know
Operating Instructions
Follow these data entry procedures to maintain Agencywide budgets.
To enter budget data:
Click on General Ledger, select Budget and PY R&E.
Click on New or Edit, depending on which you wish to do.
Select the Budget Type of Agencywide.
Budget Name: Select Agencywide Budget.
Add new line item: Click on the plus (+) sign below the grid and to the right of the Record number.
GL Code: Enter the appropriate revenue or expenditure code, or click on the combo box to choose a code from the list.
Description: This will automatically populate based upon the GL Code entered.
Amount: Specify the dollar amount of the budget for the revenue or expense code.
Distribution Grid: The grid shows the following information: GL Code and Description and Amount. If an error is discovered within the grid area information, to edit, click on the field in the distribution grid area you wish to change, use your backspace key to clear previously entered information, then re-key the correct data. If you choose to delete an entire budget line item amount, simply click on the line item you wish to remove and then click on the minus (-) sign next to Record below the grid.
Revenues: Is the total amount of all revenue line item budget amounts. This field cannot be edited.
Expenses: Is the total amount of all expenditure line item budget amounts. This field cannot be edited.
Balance: Is the total revenues over expenditures.
Save: Click this button to save a new revenue or expense line item budget just added or after changing an existing revenue or expense line item budget amount.
Delete: Click this button to delete the newly added or existing Agencywide budget.
Print: Click this button to display the Print options.
Project/Employee”.
Exit: Click the red X to exit the Budget and PY R&E.
Budget Import
There are three options in which you can prepare a spreadsheet to be imported into the GMS:
Function
Enter, change, print, display and export budgets.
Things You Should Know
- All budget procedures are organized under one menu item - Budgets/PY R&E
- You may enter budgets and print, display or export your existing budgets. Budget data, once entered, will appear in all appropriate financial reports. If changes are made to budgets these will automatically appear on reports.
- You can edit any of the fields except for budget name if errors were made during data entry.
- For existing budgets, there are two print options. These are to include signature lines on your budgets and/or to have page breaks between elements.
- When you do the year end step to roll forward R&E, only current fiscal year budgets will be listed under Existing Budgets. If Timesheet, Fringe, Indirect or Agencywide Budgets existed in the old year, they will also be included under Existing Budgets in the new year.
- Financial reports will analyze budgets by comparing actual to date amounts and computing under/over budget and percentage of budget expended.
- When you are entering budgets for a new fiscal year, make sure you have rolled forward R&E before entering them.
- Five types of budgets are maintained in the GMS system. They are Project, Agencywide, Timesheet, Fringe Benefits, and Indirect Cost Pool.
Project Budgets
These budgets appear on the element and project revenue and expenditure reports. They are to be entered for the entire grant or contract period and will be compared with project to date amounts.
Indirect Cost Budget
Entered for each indirect cost pool (elements 999000-999900). Indirect cost budgets are compared to fiscal year-to-date amounts charges in the indirect cost pools.
Fringe Benefit Budget
Used to monitor charges to the Fringe Benefit Pool. Compared to fiscal year-to-date charges in the Fringe Benefit Pool (Element 998000).
YTD Timesheet Budgets
Time sheet budgets are expressed in hours and appear on Year-to-date Timesheet Charges by Employee and by Activity reports where they are compared to fiscal year-to- date hours charged on timesheets.
Agencywide Budgets
Appear on Agencywide Line Item Revenue and Expenditure report. Enter for the agency's budget for the fiscal year. On financial reports they are compared to fiscal year-to-date revenues and expenses.
Document Attachments
The system gives you the ability to attach an external document to an existing budget. An example of an attached document is the Excel spreadsheet on which the budget was created. To accomplish this, once an existing budget is on the form, click on the Documents button on the tool bar across the top of your screen. A New Document form will appear with the Source combo box defaulted to Budget. The Doc# fields will also automatically be populated. At this point you can open Windows Explorer or My Computer and locate the document you wish to attach. Then simply drag and drop the document by placing the cursor over the document name, left click and drag it to the New Document form in GMS. Once the cursor is anywhere on the New Document form simply let go of the cursor button and the complete file name and path will appear in the File Name field. Then save the document attachment. Another option is to click on the >> symbol to the right of the File Name field and locate the document to be attached. Once the document is selected, click on open then save the document attachment.
Once a document is attached a paperclip image will appear on the bottom of the form. Should you wish to view a document already attached, click on the paper clip. If there is only one document attached, when you click on the paper clip the document will open. If there are multiple documents attached the view document form will appear and you may choose which document you wish to view.
Should you wish to add additional documents to the budget, once the grid appears with the currently attached document(s) click on the New button on the bottom of the form and repeat the attachment process.
Should you wish to “un-attach” a document, highlight the existing file name and click on the Delete button on the bottom. Note: this step does not delete the document, it merely “un-attaches” it from the existing budget.
Project/Program Budgets
Function
Enter, change, print, display, or export Program Element and Project budgets.
Things You Should Know
- All budget activity for program elements or projects may be accomplished through this function. You may enter and change budgets. You may print or display budget amounts by element or project for proofing.
- Program budgets for expenditures should always be entered at the program element level since this is how expenses are charged within the GMS system.
- Program revenue budgets may be entered either at the element or project level. You will want to make this choice based upon the particular project, your revenue reporting requirements, and the way you will code your cash receipts.
- Project budget amounts accumulate from element budgets automatically without any budget data entry work on your part. Your project budget will be the sum of the element budgets included.
- You will generally find it much easier to check, change, and maintain your program budgets if you print your budget reports at the element level.
- Budgets entered using this function will be compared to actual program to date amounts. The GMS system allows for programs (contracts and grants) to accumulate over the entire life of the project period even if this varies from the agency fiscal year. Therefore, you should enter the total program budget, not just the portion which will take place in the agency's fiscal year.
- Budget entry automatically updates Month End Revenue and Expenditure Reports. You may print these at any time to review the results of your budget data entry work.
- Program budgets are not required but are highly recommended for management purposes.
Operating Instructions
Follow these data entry procedures to maintain Program and Project budgets.
To enter budget data:
Click on General Ledger, select Budget and PY R&E.
Click on New.
Select a Budget Type, whether the budget to be entered is a Project or an Agencywide budget.
Budget Name: If Agencywide is selected, choose the appropriate agencywide budget type: Agencywide Budget, Fringe Benefit Budget, Indirect Budget or Timesheet Budget.
If Project is selected, enter the name of the Program or Project Budget you wish to enter. We recommend that the name of the budget begins with the project or element code.
Project: Select the Project that you wish to enter the budget for.
Program Element: If the budget is for the entire project, do not enter an element code. If there are separate budgets for each element within the project, then select the applicable element code for each budget name.
Note: If you enter several project’s budgets under one budget name, when and if these projects get rolled forward to the new fiscal year, it will assign new budget names for those projects that were not assigned to a budget name.
Add new line item: Click on the plus (+) sign below the grid and to the right of the Record number.
GL Code: Enter the appropriate revenue or expenditure code, or click on the combo box to choose a code from the list.
Description: This will automatically populate based upon the GL Code entered.
Project: This will automatically populate based upon the Project entered above.
Elem: Enter the desired element number or click on the combo box to choose a program element from the list. If you entered an element number above, this will be automatically populated with that number.
Amount: Specify the dollar amount of the budget for revenue or expense for that particular program element or project.
Prior Year: This will be automatically populated if you have rolled forward the element selected.
Distribution Grid: The grid shows the following information: GL Code and Description, Project, Program Element, Amount and Prior Year, if applicable. If an error is discovered within the grid area information, to edit, click on the field in the distribution grid area you wish to change, use your backspace key to clear previously entered information, then re-key the correct data. If you choose to delete an entire budget line item amount, simply click on the line item you wish to remove and then click on the minus (-) sign next to Record below the grid.
Revenues: Is the total amount of all project and program element revenue line item budget amounts. This field cannot be edited.
Expenses: Is the total amount of all project and program elements expenditure line item budget amounts. This field cannot be edited.
Balance: Is the total revenues over expenditures.
If you wish to Edit an existing budget:
Click on the budget name in the listing of your budgets.
Edit: Click this button to edit any information in the grid.
Save: Click this button to save a new revenue or expense line item budget just added or after changing an existing revenue or expense line item budget amount.
Delete: Click this button to delete a newly added or an existing Program or Project budget.
Print: Click this button to display the Print options.
- By Project/Employee
- By Element
- Include signature lines
- Page break between Elements
- Budgets to print: Click in the box next to Budget Name if you wish to print all budgets. Otherwise, click the individual budgets you wish to print.
Element”.
Exit: Click the red X to exit the Budget and PY R&E.
Indirect Budget
Function
Enter, change, print, display or export the Indirect Cost Budget.
Things You Should Know
- The basic GMS system provides for up to 10 indirect cost pool program elements (999000- 999900). This function enables you to enter line item budgets for these elements and to print or display the budgets.
- You may use both revenue and expenditure codes to establish your indirect cost budget. When you enter these budgets, you must specify the element number.
- Indirect cost budget amounts should be entered for the agency’s fiscal year. When these budgets are used on the Month End - Indirect Rate Computation and Analysis, they will be compared with actual fiscal year-to-date amounts charged to the indirect cost pool.
- Indirect cost budgets will also appear on the Month End - Agencywide Report (with indirect cost detail). In this instance, the agency wide total for indirect costs will be replaced by the line item budgets which comprise the indirect cost pool.
- Indirect cost pool budgets are not required but are highly recommended for use in monitoring costs compared to the Indirect Cost Plan.
Operating Instructions
Follow these data entry procedures to maintain the Indirect Cost Pool budget.
To enter or change budget data, Click on General Ledger, then select Budget and PY R&E.
Select New if you are entering a new budget. Select Type of Agencywide. Next select Indirect Budget as the Budget Name.
If making changes to an existing budget, select Indirect Budget from the listing of your budgets. Click on Edit.
Add new line item: Click on the plus (+) sign below the grid and to the right of the Record number.
GL Code: Enter the appropriate revenue or expenditure code, or click on the combo box to choose a code from the list.
Description: This will automatically populate based upon the GL Code entered.
Project: This will automatically populate based upon the Budget name selected above.
Program Element: Enter the desired element number or click on the combo box to choose a program element from the list. You may use 999000-999900.
Amount: Specify the dollar amount of the budget for revenue or expense for that particular program element.
Tap enter or click on the next row to record entered budget information.
Distribution Grid: The grid shows the following information: GL code and description, project code, program element code, and amount. If an error is discovered within the grid area information, to edit click on the field in the distribution grid you wish to change, use your backspace key to clear previously entered information, then re-key the correct data. If you choose to delete an entire budget line-item amount, simply click on the line item you wish to remove and then click on the minus (-) sign next to Record below the grid.
Revenues: Is the total amount of the Indirect Cost Pool revenue line item budget amounts. This field cannot be edited.
Expenses: Is the total amount of the Indirect Cost Pool expenditure line item budget amounts. This field cannot be edited.
Balance: Is the total Revenues over Expenditures.
Save: Click this button to save a new revenue or expense line item budget amount just added or after changing an existing revenue or expense line item budget amount.
Delete: Click this button to delete the Indirect Budget.
Print by Element: Click this to print or display a list of all existing Indirect Cost Pool Element Budgets.
Print by Project/Employee: Click this button to print or display a list of all existing Indirect Cost Pool Project Budgets.
Exit: Click the red X to exit the Budget and PY R&E.
Fringe Benefit Budget
Function
Enter, change, print, display, or export the Fringe Benefit Pool Budget.
Things You Should Know
- The basic GMS system uses element 998000 for the fringe benefit pool. This function enables you to enter and change line item budget amounts for the fringe benefit pool and to print, or display this budget.
- Fringe benefit budgets should be entered for the agency’s fiscal year. When these budgets are used on the Month End - Fringe Benefit Rate Computation and Analysis, they will be compared with actual fiscal year-to-date amounts charged to the fringe benefit pool.
- Fringe benefit budgets are not required but highly recommended for management purposes.
- Follow these data entry procedures to maintain fringe benefit budgets.
Operating Instructions
To enter or change budget data, Click on General Ledger, then select Budgets and PY R&E.
Select New if you are entering a new budget. Select Type of Agencywide. Next select Fringe Benefit Budget as the Budget Name.
If making changes to an existing budget, select Fringe Benefit Budget from the listing of your budgets. Click on Edit.
Add new line item: Click on the plus (+) sign below the grid and to the right of the Record number.
GL Code: Enter the appropriate expenditure code, or click on the combo box to choose a code from the list.
Description: This will automatically populate based upon the GL Code entered.
Project: This will automatically populate based upon the Budget name selected above.
Program Element: Enter the element number 998000 or click on the combo box to choose the program element number 998000.
Amount: Specify the dollar amount of the budget line item expenditure for the Fringe Benefit Cost Pool Budget.
Tap enter or click on the next row to record entered budget information.
Distribution Grid: The grid shows the following information: GL code and description, project, element, project, and amount. If an error is discovered within the grid area information, to edit, click on the field in the distribution grid you wish to change, use your backspace key to clear previously entered information, then re-key the correct data. If you choose to delete an entire budget line-item amount, simply click on the line item you wish to remove and then click on the minus (-) sign next to Record below the grid.
Revenues: This amount would be zero at all times since no revenue line item budget amounts are to be entered for the Fringe Benefit Cost Pool. This field cannot be edited.
Expenses: Is the total amount of the Fringe Benefit Cost Pool expenditure line item budget amounts. This field cannot be edited.
Save: Click this button to save a new expense line item budget amount just added or after changing an existing expense line item budget amount.
Delete: Click this button to delete the Fringe Benefit Budget.
Print by Element: Click this button to print or display the Fringe Benefit Element Budget.
Print by Project/Employee: Click this button to print or display the Fringe Benefit Project Budget.
Exit: Click the red X to exit.
Time Sheet Budgets
Function
Enter, change, edit, display, print or export the employee timesheet budgets.
Things You Should Know
- You may enter detailed Timesheet budgets for each employee. Expressed in hours, these budgets will appear on the Year-To-Date Timesheet Charges by Employee and Year-To-Date Timesheet Charges by Activity reports printed during monthly processing.
- This function enables you to enter or change these budgets. You may also print, or display those budgets for a specific employee.
- Budgeted Timesheet hours should be entered on an agency fiscal year-to-date basis. At month end they will be compared to actual fiscal year-to-date hours charged.
- Timesheet budgets are not required.
Operating Instructions
To enter or change budget data, Click on General Ledger, then select Budgets and PY R&E.
Select New if you are entering a new budget. Select Type of Agencywide. Next select Timesheet Budget as the Budget Name.
If making changes to an existing budget, select Timesheet Budget from the listing of your budgets. Click on Edit.
Add new line item: Click on the plus (+) sign below the grid and to the right of the Record number.
Employee Num: Enter the employee’s code number, or click on the combo box to choose a code from the list.
Name: This will automatically populate based upon the Employee Code entered.
Project: This will automatically populate based upon the element number entered.
Program Element: Enter the program element number from which the employee’s working hours or leave time will be paid.
Hours: Enter the hours budgeted for the selected element.
Emp Class: This will automatically populate based upon the class assigned to the employee in the Employee Master File.
Tap enter or click on the next row to record entered budget information.
Distribution Grid: The grid shows the following information: Employee number and name, project, program element, hours, and employee’s class code. If an error is discovered within the grid area information, to edit, click on the field in the distribution grid you wish to change, use your backspace key to clear previously entered information, then re-key the correct data. If you choose to delete an entire budget line-item amount, simply click on the line item you wish to remove and then click on the minus (-) sign next to Record below the grid.
Hours: This will be the sum total of the hours entered. This field cannot be edited.
Save: Click this button to save a new budget just added or after changing an existing line item budget amount.
Delete: Click this button to delete the Timesheet Budget.
Print by Element: Click this button to print or display the Timesheet Budget by Element code.
Print by Project/Employee: Click this button to print or display the Timesheet Budget by Employee.
Exit: Click the red X to exit.
Agencywide Budgets
Function
Enter, change, print, or display agency wide budgets.
Things You Should Know
- The GMS system enables you to maintain an agency wide fiscal year line item budget. Since the agency wide budget may or may not be the sum of individual program budgets (They may be funded for a different period of time), these budgets are maintained in addition to individual program budgets.
- Agency wide budgets maintained in this manner will automatically appear on the Month End - Agencywide Revenues and Expenditures Report. On this report current fiscal year-to-date amounts will be compared. Both under/over amounts and percent of budget expended will be calculated.
- This function will permit you to enter and change these budgets. You may also print, or display budgeted amounts.
- Agencywide budgets are not required but may be useful for management purposes.
Operating Instructions
Follow these data entry procedures to maintain Agencywide budgets.
To enter budget data:
Click on General Ledger, select Budget and PY R&E.
Click on New or Edit, depending on which you wish to do.
Select the Budget Type of Agencywide.
Budget Name: Select Agencywide Budget.
Add new line item: Click on the plus (+) sign below the grid and to the right of the Record number.
GL Code: Enter the appropriate revenue or expenditure code, or click on the combo box to choose a code from the list.
Description: This will automatically populate based upon the GL Code entered.
Amount: Specify the dollar amount of the budget for the revenue or expense code.
Distribution Grid: The grid shows the following information: GL Code and Description and Amount. If an error is discovered within the grid area information, to edit, click on the field in the distribution grid area you wish to change, use your backspace key to clear previously entered information, then re-key the correct data. If you choose to delete an entire budget line item amount, simply click on the line item you wish to remove and then click on the minus (-) sign next to Record below the grid.
Revenues: Is the total amount of all revenue line item budget amounts. This field cannot be edited.
Expenses: Is the total amount of all expenditure line item budget amounts. This field cannot be edited.
Balance: Is the total revenues over expenditures.
Save: Click this button to save a new revenue or expense line item budget just added or after changing an existing revenue or expense line item budget amount.
Delete: Click this button to delete the newly added or existing Agencywide budget.
Print: Click this button to display the Print options.
- By Project/Employee
- By Element
- Include signature lines
- Page break between Elements
- Budgets to print: Click in the box next to Budget Name if you wish to print all budgets. Otherwise, click the individual budgets you wish to print.
Project/Employee”.
Exit: Click the red X to exit the Budget and PY R&E.
Budget Import
There are three options in which you can prepare a spreadsheet to be imported into the GMS:
- Download the relevant Budget Templates below and input your information into the templates.
- Export a budget from GMS that exists in the software. This would be a good option to use for a budget amendment to an existing budget. See Budget Export instructions after Budget Import Instructions.
- Create a budget from blank spreadsheet file prepared in spreadsheet software, i.e. Excel, the structure needs to be entered in the following manner:
|
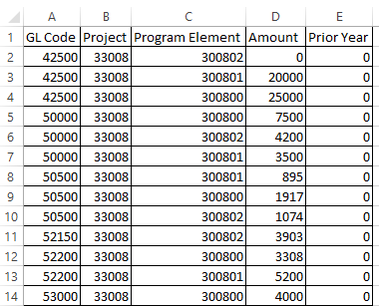
Project/Element Budgets
Fringe Benefits Budget
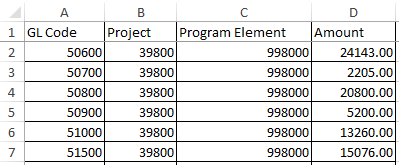
|
Agencywide Budget

Indirect Budget

| ||||||||
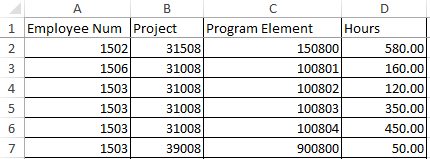
Timesheet Budget
| |||
- Column headings must be the first row in the spreadsheet.
- All columns reflected above must be contained in each of your spreadsheets and each row must contain numeric values in each column.
- Each budget must be saved as a separate file with only one sheet.
- Save the file with an Excel file extension or the extension of the spreadsheet software you are using.
IMPORTANT
Projects that were rolled forward from the old fiscal year already have prior year amounts in the current budget. These prior year amounts MUST be included under the Prior Year Column in the spreadsheet you are importing.
Projects that were not rolled forward will have zeros under Prior Year Column in the current budget. Zeros MUST be included under the Prior Year Column in the spreadsheet you are importing.
To Import a budget to:
Project:
Under General Ledger, Budget and PY R&E.
If the Budget Name does not exist In the Budget List then click on New. Select Project for Type and assign a budget name. GMS recommends that the Project number be included at the beginning of the Project budget name. Click on the drop down box to select the project and program element if the budget is for a specific element. If the budget includes several elements, leave the element field blank.
If the Budget Name exists in the budget list; click once on the budget name you wish to import to and then click edit.
Agencywide, Fringe Benefit, Indirect, Timesheet:
Click General Ledger, Budget and PY R&E.
If the Budget Name does not exist In the Budget List then click on New, Select Agencywide for Type and choose one Budget Name:
- Agencywide
- Fringe Benefit Budget
- Indirect Budget
- Timesheet Budget
If the Budget Name exist in the budget list; click once on the budget name you wish to import to and then click edit.
To Import Budget:
Click on Budget Import icon. Locate the drive and folder where the spreadsheet file is located. In the window in the middle of the screen, all the files in that folder will be displayed. Double click on the file you wish to import.
Answer Yes to replace the current budget or answer No to add to an existing budget. Adding to an existing budget will add only a new general ledger code and budget that does not currently exist in the current budget.
There will only be a message if the budget was not imported properly. Click save to save the imported budget.
Budget Export
If you wish to export Budgets from GMS into a spreadsheet software file, i.e. Excel, click on the Export icon and select the destination in which you wish to save the file.
If you wish to export Budgets from GMS into a spreadsheet software file, i.e. Excel, click on the Export icon and select the destination in which you wish to save the file.
