
WELCOME TO GMS ACCOUNTING ONLINE HELP
The help you need at your fingertips.
You are here: Tools > Organization > Accounts Payable Direct Deposit
Accounts Payable Direct Deposit
The accounts payable direct deposit information must be set up when Supplement #405 Accounts Payable Direct Deposit is installed.
The accounts payable direct deposit information must be set up when Supplement #405 Accounts Payable Direct Deposit is installed.
Function
Enables the accounts payable processing software to prepare data for your bank to automatically deposit check amounts directly into vendors’ bank accounts.
Things You Should Know
Organization Name: Enter the bank accepted agency name.
Enables the accounts payable processing software to prepare data for your bank to automatically deposit check amounts directly into vendors’ bank accounts.
Things You Should Know
- File data is prepared in accordance with the National Automated Clearing House Association (NACHA) procedures, the standard followed by nearly all banking institutions. These procedures permit your bank to deposit funds into vendors’ bank accounts even if they bank with another institution.
Organization Name: Enter the bank accepted agency name.
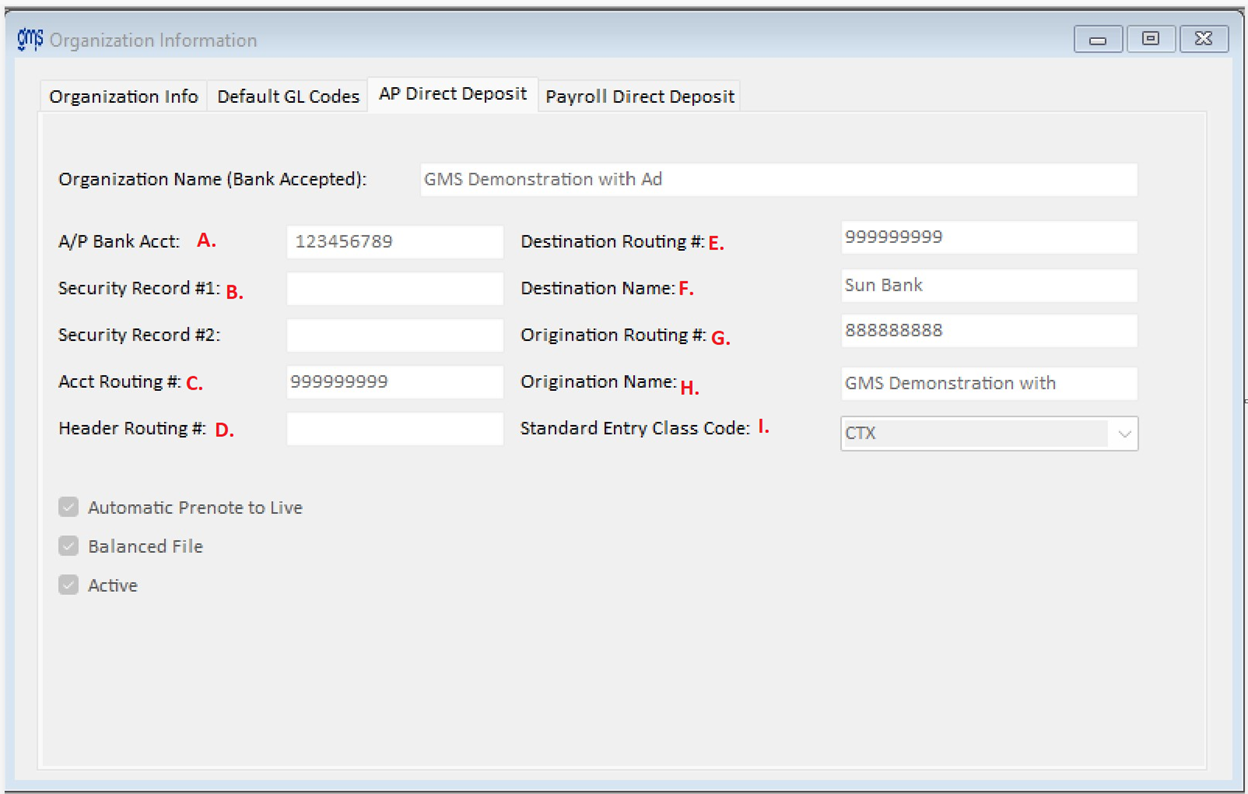
(A) A/P Bank Acct: Enter the agency’s bank account number from which funds should be withdrawn. This field is alpha-numeric. No dashes or spaces should be used.
(B) Security Record #1: If the bank requires a lead security record at the beginning of the direct deposit file, it would be entered here. No dashes or spaces should be used.
(B) Security Record #2: If the bank requires a secondary lead security record at the beginning of the direct deposit file, it would be entered here. No dashes or spaces should be used.
(C) Acct Routing #: Enter your bank’s routing number. No dashes or spaces should be used.
(D) Header Routing #: In most cases the header number and the number appearing in records 5 and 8 of the NACHA file transmitted to your bank are the same. If this is the case, then all three fields are populated by the routing number you enter.
(E) Destination Routing #: Enter the routing number of the Destination Depository Financial Institution, typically your local bank. However, it may be the Federal Reserve Bank’s number, depending on who processes the file. No dashes or spaces should be used.
(F) Destination Name: Enter the name of the Destination Depository Financial Institution, typically your local bank. However, it may be the Federal Reserve Bank, depending on who processes the file.
(G) Origination Routing: If your local bank is the destination name entered above, you would enter your agency’s Federal ID number in this field. In the circumstance that the destination name is a Federal Reserve Bank, you would enter your local bank’s ABA routing number. No dashes or spaces should be used. If your bank requires a “1” between the destination routing number and the organization routing number enter a 1 in front of your organization number. This is a filler space and is normally left blank.
Note: For banks that require a special designation in this area, the field is alpha/numeric.
(H) Origination Name: If your local bank is the destination name entered above, you would enter your agency’s bank accepted name, the same as was entered in Organization name. In the circumstance that the destination name is a Federal Reserve Bank, you would enter your local bank’s name.
(I) Standard Entry Class Code: Select the proper NACHA file format required by your bank. Your options are: PPD, CCD, CTX and CTP.
Note: Should you use AP Direct Deposit for MS Virtual Roma payments the standard Entry Class Code must be CTX.
Automatic Prenote to Live: Check this box if the vendors are to be automatically changed to live after the first check to that vendor is saved.
Balanced File: If the bank requires a balanced file, check this box.
Active: Uncheck the active box to issue checks to vendors that are paid through AP Direct Deposit normally.
