WELCOME TO GMS ACCOUNTING ONLINE HELP
The help you need at your fingertips.
You are here: General Ledger > G/L Supplements > #406 Report Writer
#406 Report Writer
Function
Report Writer allows an agency to build its own reports according to each agency’s specific needs. A user needs to have basic knowledge about tables, queries and databases in order to take advantage of this supplement.
Operating Instructions
Open Report Writer
Open Report Writer
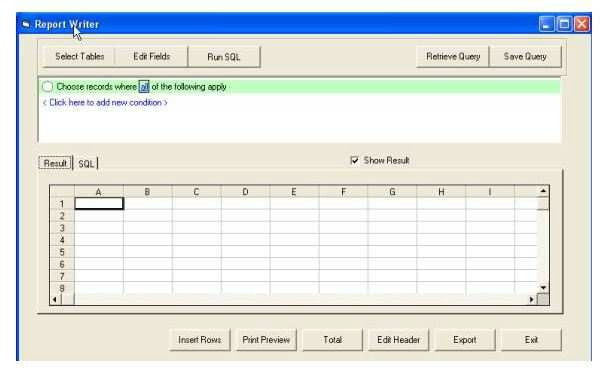
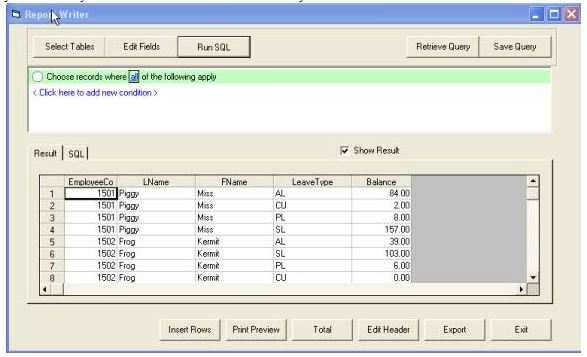
The report writer is divided into two parts. The top part is a query builder. The bottom part is the spreadsheet to display results. There are 3 buttons at the top that need to be done one after the other in order.
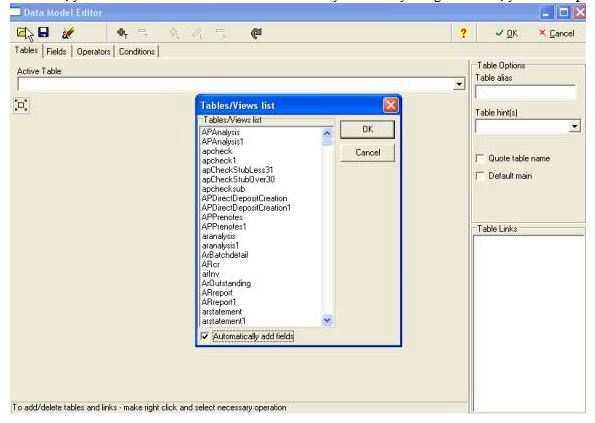
I. first button is Select Tables. Once you click on it, a Data Model Editor will be displayed. It allows you to choose any tables and queries in the current database. Right click and choose Add new table or click on +T on the menu bar. You can select more than one table at a time by Ctrl+Click. If you select more than one table, you need to add the Link between them. If you are only using one table, you can skip this section and refer to section II.
I. first button is Select Tables. Once you click on it, a Data Model Editor will be displayed. It allows you to choose any tables and queries in the current database. Right click and choose Add new table or click on +T on the menu bar. You can select more than one table at a time by Ctrl+Click. If you select more than one table, you need to add the Link between them. If you are only using one table, you can skip this section and refer to section II.
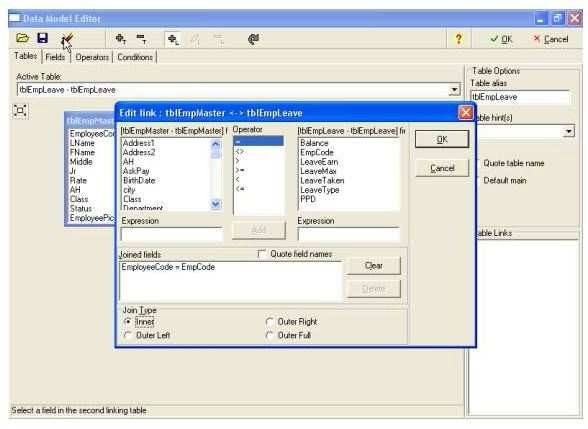
Add/Edit/Delete Links between tables:
|
|
4. You can select Join Type on the bottom of the form. The default is Inner Join. And we recommend you to use it in most cases.
|
|
a. Inner Join means only those records that exist in both tables will be selected.
b. Outer Left means select all the records from the first table but only the records that match from the second table.
c. Outer Right means select all the records from the second table but only those records that match from the first table.
d. Outer Full means select all the records from both tables. This option is typically not used.
|
|
5. Look at the Joined Fields to make sure that’s the link you want. You can just click on OK button to close the form and back on Data Model Editor.
6. If you have more than 2 tables, you need to repeat the previous step again. Make sure you have lines in between all the tables.
7. At this time, if you wish to save this structure design and use it later, you can click on the Save button on the menu bar. Give it a meaningful name that you can easily recognize next time. Otherwise click on the OK button to exit the form and go back to the main form.
|
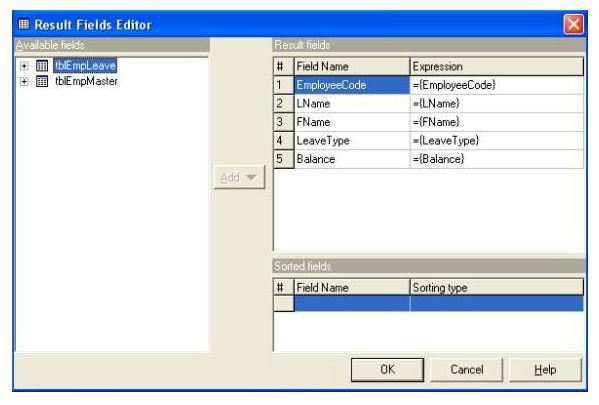
II. The second button is Edit Fields. Once you click on it the Result Fields Editor will pop up.
|
1. The left panel is the list of tables you selected. Double click on each field you wish to see on your report, and they will be listed in the upper right.
2. If you need to do a total column to a numeric field on the report the options are:
|
|
a. SUM
b. COUNT c. MIN d. MAX e. AVERAGE |
|
Highlight the field you wish to total from the left panel, pick the operator from the Add button in between the panels.
|
3. If you need to add one field to another the options are:
|
a. Add to result field
b. Subtract from result field c. Multiply by result field d. Divide by result field |
|
Highlight the result field name from the right panel. Click on the field from the left panel and you can see both fields are highlighted. Click on the Add button and pick the option you wish, and it will be listed in your result fields.
|
4. If you need to delete a field from your selection, right click on that field line and click on Delete Result Field.
5. If you need to sort the report by a specific field, right click on the field and choose Sort Result Field, it will put it in the grid.
6. If you need to change the column heading. Double click on the Field Name from the Result Fields. Make the change and then Press Enter button.
7. After you are done, you can click on OK to exit the form and go back to the main form.
III. The third button is Run SQL. Once you click on it, all the related data will be displayed in the bottom part of the form. Before you click on this button, if you have any conditions you wish to use to eliminate records you should do it first.
1. Click on Click here to add new condition. It will add the first condition for you. You need to choose the field and add operator options. For numeric fields you can see the following options:
|
a. is equal to
b. is not equal to c. is less than d. is less than or equal to e. greater than f. greater than or equal to g. is in list h. is null i. is in between |
For text fields you can see the following options:
|
a. starts with
b. does not start with c. contains d. does not contain |
1. You can add as many conditions as you wish. If you want to delete a condition, click on number and select Delete Current Row. All the unused conditions should be deleted.
2. Click on Run SQL and all the records will show in the grid.
3. At this point if you get a message here are the things you need to check:
|
a. If you are using more than one table, check the link between tables.
b. If you have conditions, you can check if the conditions are right. c. After checking and you still get this message, you can delete all the conditions and run sql without any conditions. If nothing seems to be wrong and you still get this message it means no records match your selection. |
4. You can click on the title of each column to sort the records.
5. If you are familiar with Excel or Word, you can highlight all the rows and click on Ctrl+C/CtrV to paste it in Excel or Word. Or you can click on Export button to export the file to Excel.
6. Make the necessary changes and have it look like the report you need. You can click on Edit Header button to enter a header or footer on the report.
7. If you just need to print it for your own reference, click on Print Preview button and print the report from there. If you need to total the number column, click on the Insert Rows button to insert a row, then highlight the whole column you wish to total. Click on the Total button and it will add the total to the bottom of the column.
8. At this point if you need to save the query and use it next time you need to click on Save Query button. Give it a meaningful name and you can use the same name you used when you saved Data Model Editor.
9. A saved report should have both a saved structure and a saved query in order to be used next time.
How to retrieve a report:
- You have to click on Select Tables and click on the Open button on the menu bar. Find the structure you saved and click on it. Then click on the OK button to exit Data Model Editor form.
- Click on the Retrieve Query button. Click on the query you saved.
- Click on Run SQL button and it will display the reports with refreshed new data.
We recommend that you set up a folder just for Report Writer Formats so they can easily be retrieved.
Clear Results Field
After you have completed preparing one report and if you wish to create another report from the beginning, you can click on the Select Tables then click on the third icon from the left called “Clear data model”. Then click on OK at the top right of the Data Model Editor Form.
Then click on the Clear Results Field button and you can start preparing your next report without exiting and logging back into Report Writer. After you have cleared both the data model and result field, you will notice that the information in the grid is not cleared until you Run SQL for the next report.
Note: If you have completed one report and you wish to run a report that has been previously saved, you need not go through the Clear Result Fields process. Simply click on Select Tables then click on the Yellow Folder icon on the top left of the screen. Select the desired database structure and click on OK. Then retrieve the desired query from the report writer main screen.
Insert Row
This will insert a blank row at the bottom the result grid.
This will insert a blank row at the bottom the result grid.
Total
Should you wish to total a column in the results grid, highlight the amounts in the desired column and click on Total. This will add to total to the bottom of the selected column.
Should you wish to total a column in the results grid, highlight the amounts in the desired column and click on Total. This will add to total to the bottom of the selected column.
Edit Header
Click on this button to insert a header on the top of the report. Note: Once entered, you will not see the header until you display or print the report through Print Preview.
Click on this button to insert a header on the top of the report. Note: Once entered, you will not see the header until you display or print the report through Print Preview.
Export
This button will automatically launch Excel and export the current report along with column headings as they appear into a spreadsheet.
This button will automatically launch Excel and export the current report along with column headings as they appear into a spreadsheet.

